Styling DataTable
You can use CSS to achieve the desired look-and-feel of Datatable.
You can fine-tune the style of:
The Whole Table
To apply some style to a whole table you can use the css parameter. As the value of the parameter, you must specify the name of the appropriate CSS class.
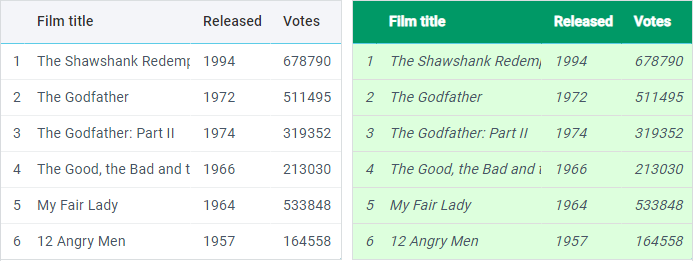
Styling the whole table
<style> .my_style .webix_hcell{
background:#009966;
color:white;
font-weight:bold;
}
.my_style .webix_column{
font-style:italic;
background:#ddFFdd;
}
.my_style .webix_column > div{
border-color:#ddd;
}
</style>
<script>webix.ui({
view:"datatable",
css:"my_style"
});
</script>
Columns
To apply some style to a specific column, you should specify the css attribute within the columns parameter while configuring a column.
As a value of the attribute you can specify:
- the name of the appropriate CSS class;
- an object containing the CSS properties.
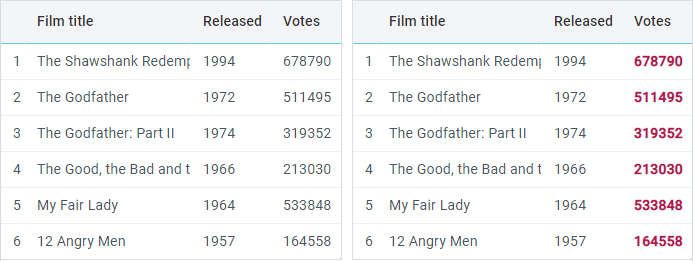
Styling a single column
<style> .my_style {
font-weight:bold;
color:#B51454;
}
</style>
<script>webix.ui({
view:"datatable",
columns:[
// a separate CSS class
{ id:"title", header:"Film title", css:"my_style" },
// an object with CSS properties
{ id:"votes", header:"Votes", css:{"text-align":"right"}}
],
...
});
</script>
Related sample: Columns Styling
Material Skin and Column Borders
If you use the default Material skin or its compact version Mini, there are no borders between columns:
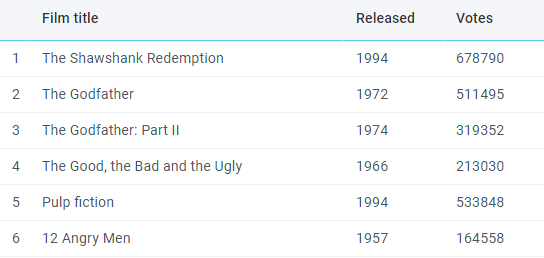
If you want borders between the columns of the header and / or the columns of the body of Datatable, you can add them by adding the corresponding CSS classes:
wbix.ui({
    view:"datatable",
    id:"datatable",
    css:"webix_header_border webix_data_border",     columns:[
        { id:"rank", header:"", width:30 },
        { id:"title", header:"Film title", fillspace:true },
        { id:"year", header:"Released" },
        { id:"votes", header:"Votes" }
    ],
    scroll:false,
    data:small_film_set
});
Related sample: Datatable with column borders in Material and Mini skins
Rows
Generally, to apply some style to a specific row, you may use the $change key of the scheme parameter. The key is a function that runs each time data are changed in the table. As a parameter, the function takes the data item object.
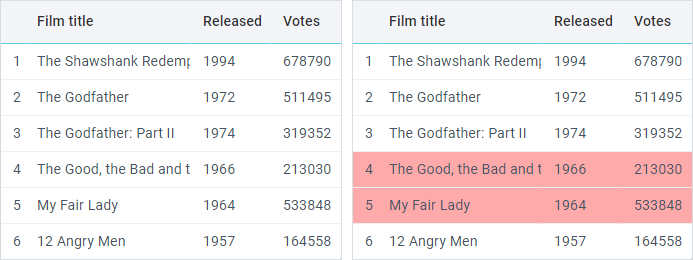
General styling of rows
<style> .highlight{
background-color:#FFAAAA;
}
</style>
<script>webix.ui({
view:"datatable",
scheme:{
$change:function(item){
if (item.year > 1980)
item.$css = "highlight";
}
},
columns:[
{ id:"title", header:"Film title"},
{ id:"votes", header:"Votes"}
]
});
</script>
If you specify data directly inside the DataTable constructor, you have one more way to set the desired style for a row.
You can use the $css attribute inside the data parameter to set the desired style.
We don't recommend to dynamically change attributes with the '$' prefix (e.g. $css, $cellCss). Please, use the addCellCss, addRowCss methods instead.
Setting rows style directly in the dataset
<style> .my_style{
background-color:#FFAAAA;
}
</style>
<script>webix.ui({
view:"datatable",
columns:[
{ id:"title", header:"Film title"},
{ id:"votes", header:"Votes"}
],
data:[
{
id:1,
$css:"my_style",
title:"The Shawshank Redemption",
votes:678790
},
{
id:2,
$css:{ "text-align":"right" },
title:"The Godfather",
votes:511495,
}
]
});
</script>
Applying hover styles
You can specify a custom style for selection of a row when the mouse pointer is over it.
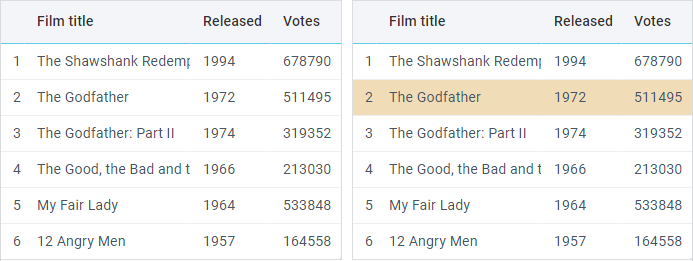
For this purpose, you should define your CSS style in the hover property.
<style> .myhover{
background: #F0DCB6;
}
</style>
<script>webix.ui({
view:"datatable",
columns:[
{ id:"title", header:"Film title", width:200},
{ id:"year", header:"Released", width:80},
{ id:"votes", header:"Votes", width:100}
],
hover:"myhover"
});
</script>
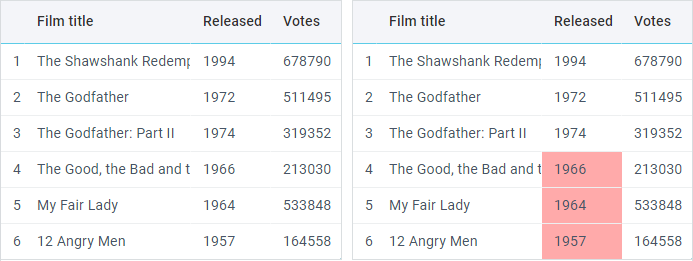
Cells
Applying cssFormat method
Generally, to apply some style to specific cells in a column, you should use the cssFormat attribute inside the columns parameter. The attribute sets a function that will define how cells of the column must be colored. The function takes the following parameters:
- cell value (compulsory) - current cell value;
- row item object - all values for the current row;
- row ID - ID of the row in question;
- column ID - ID of the column in question.
General styling of cells
function mark_votes(value, config){
    if (value > 400000)
        return { "text-align":"right" };
};

webix.ui({
    view:"datatable",
    columns:[
        { id:"title", header:"Film title"},
        { id:"votes", header:"Votes", cssFormat:mark_votes }
    ],
});
Cell styling within configuration
If you specify data directly inside the DataTable constructor, you have one more way to set the desired style for a cell - the $cellCss property.
We don't recommend to dynamically change attributes with the '$' prefix (e.g. $css, $cellCss). Please, use the addCellCss, addRowCss methods instead.
Setting cells style directly in the dataset
<style> .my_style{
background-color:#FFAAAA;
}
</style>
<script>webix.ui({
view:"datatable",
columns:[
{ id:"title", header:"Film title"},
{ id:"votes", header:"Votes"}
],
data:[
{
id:1,
title:"The Shawshank Redemption",
votes:678790,
$cellCss:{
votes:"highlight"
}
},
{
id:2,
title:"The Godfather",
votes:511495,
$cellCss:{
votes:{ "text-align":"right" }
}
}
]
});
</script>
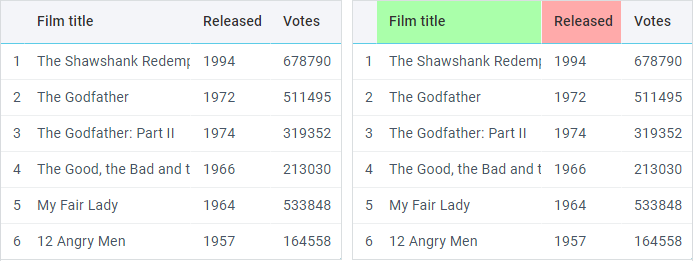
Header
To set style for a specific cell of the header you should use the following technique:
General styling of the header
<style> .my_style{
background-color:#FFAAAA;
}
</style>
<script>webix.ui({
view:"datatable",
columns:[
{ id:"title", header:{ text:"Film title", css:{ "background":"#AFA"}} },
{ id:"votes", header:{ text:"Votes", css:"my_style"} }
]
});
</script>
Related sample: Header Styling
CSS Maps
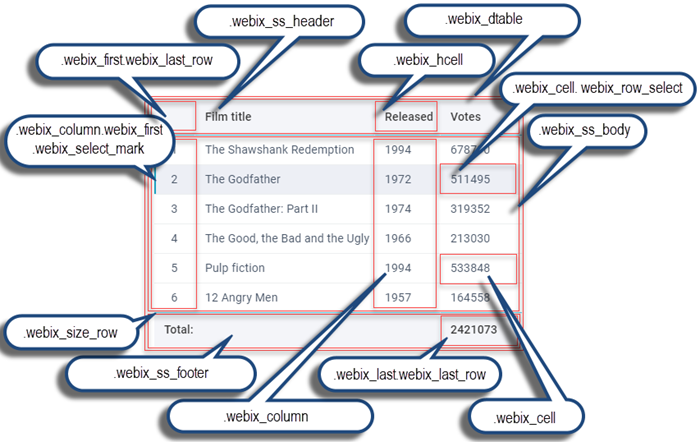
CSS image maps
The list of CSS classes with their descriptions is given below:
- .webix_dtable - the container with DataTable
- .webix_ss_header - the container with the header
- .webix_ss_header .webix_hcell - a cell of the header
- .webix_ss_header .webix_hcolumn - a column of the header
- .webix_ss_header .webix_first - the first cell of the header
- .webix_ss_header .webix_last - the last cell of the header
- .webix_ss_footer - the container with the footer
- .webix_ss_footer .webix_hcell - a cell of the footer
- .webix_ss_footer .webix_first - the first cell of the footer
- .webix_ss_footer .webix_last - the last cell of the footer
- .webix_ss_body - the container with the table body
- .webix_column - a column of the table
- .webix_column .webix_last - the last column of the table
- .webix_column .webix_first - the first column of the table
- .webix_column .webix_cell - a cell of the column
If you have not checked yet, be sure to visit site of our main product Webix javascript ui components library and page of ui datagrid product.