Available only in PRO Edition
Using Sparklines in Datatable
Sparklines are small graphs embedded into the datatable and used for presenting the general variation of certain parameters. Each data value is specified as a point in the sparkline. Depending on the value, points are located at a different height relative to each other.
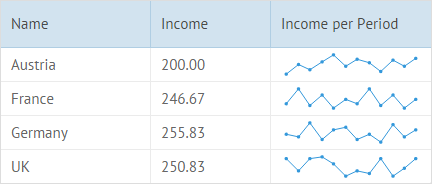
Sparklines are set in the datatable through the {common.sparklines()} template. The column's id coincides with the property in the data set that contains data values. The Sparklines chart is built on the basis of these values:
webix.ui({
    view:"datatable",
    columns:[
        { id:"name", header:"Name", width:150},
        { id:"avIncome", header:"Income", width:120},
        // sparklines
        {
            id:"income",
            header:"Income per Period",
            template:"{common.sparklines()}",
            width:160
        }
    ],
    autoheight:true,
    autowidth:true,
    data: [
        { id:1, name:"Austria", income:[150,200,170,210,250,190], avIncome: 200},
        { id:2, name:"France", income:[230,300,220,270,210,250], avIncome: 246.67},
        { id:3, name:"Germany", income:[250,240,300,230,270,280], avIncome: 255.83},
        { id:4, name:"UK", income:[280,230,280,290,260,210], avIncome: 250.83}
    ]
});
Sparklines Types
There are six types of Sparklines representation available:
To create a template function for a sparkline with the type different from the default one, use the webix.Sparklines.getTemplate("type_name") method.
Line Sparklines

{
    id:"income",
    header:"Income per Month",
    template: "{common.sparklines()}",
    width:200
}
Area Sparklines
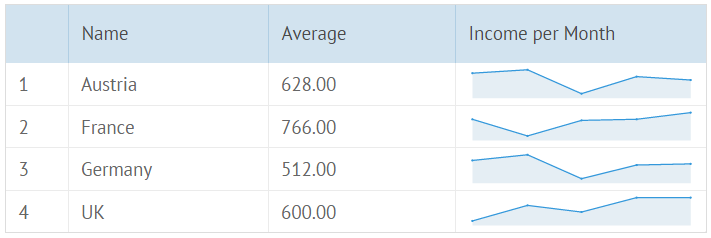
{
    id:"income",
    header:"Income per Month",
    template: webix.Sparklines.getTemplate("area"),
    width:200
}
Bar Sparklines
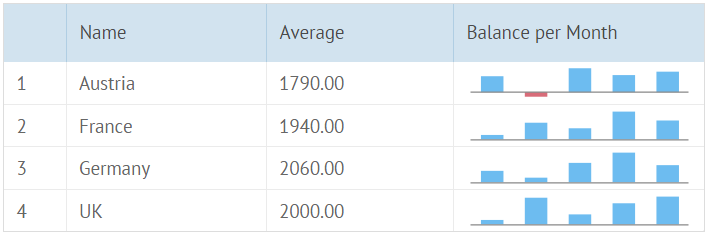
{
    id:"balance",
    header:"Balance per Month",
    template: webix.Sparklines.getTemplate("bar"),
    width:200
}
Spline Sparklines

{
    id:"income",
    header:"Income per Month",
    template: webix.Sparklines.getTemplate("spline"),
    width:200
}
SplineArea Sparklines

{
    id:"income",
    header:"Income per Month",
    template: webix.Sparklines.getTemplate("splineArea"),
    width:200
}
Pie Sparklines

{
    id:"income",
    header:"Income per Month",
    template: webix.Sparklines.getTemplate("pie"),
    width:200
}
Radar Sparklines

{
    id:"income",
    header:"Income per Month",
    template: webix.Sparklines.getTemplate("radar"),
    width:200
}
Sparklines Tooltips
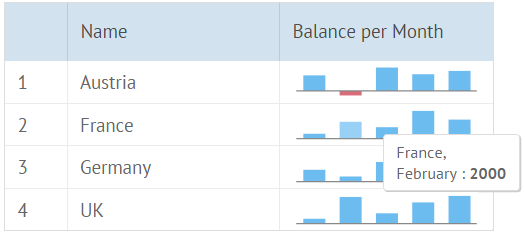
You can specify tooltips for sparklines values in datatable. They will appear when the user will move the mouse pointer over the sparklines items (bars, sectors).
Sparklines tooltip is set via the "tooltip" template. The template function takes a data item of Sparkline as the first parameter.
webix.ui({
    view:"datatable",
    columns:[
        {
            id:"values", header:"Values",
            template: "{common.sparklines()}",
            tooltip: function(obj, common, value, index){
                if (!value)
                    return "";
                return obj.name+",<br/>"+value.month+" : <b>"+value.value+"</b>";
            }
        },
        ...
    ],
    tooltip: true,
    ...
    data: [
        {id: 1, name: "Austria", values: [
            {value: 2000, month: "January"},
            {value: 1000, month: "February"},
            {value: 3000, month: "March"}
        ]},
        ...
    ]
});
Related sample: Tooltips Definition
Customizing Sparklines
You can customize sparklines by providing custom options in their configuration:
webix.Sparklines.getTemplate({
    type:"bar", // sparkline type
    paddingY:0, // other settings
    origin:300
});
Related sample: Sparkline Settings
For a Bar type, you can set horizontal bars (barH):
webix.Sparklines.getTemplate({
    type:"bar",
    horizontal: true
});

For a Pie type, you can set a donut option to display it with a round empty space inside:
webix.Sparklines.getTemplate({
    type:"pie",
    donut: true
});

The set of available options depends on the sparkline type:
Line sparkline settings
- paddingX - left and right padding
- paddingY - top and bottom paddings
- radius - the point radius
- eventRadius - the radius of a clickable area around the point
- minHeight - the minimal height
- css - a custom CSS class for the sparkline
- origin - the scale origin
- scale - the maximum scale value
- color - the line color
Bar sparkline settings
- paddingX - the left and right padding
- paddingY- top and bottom paddings
- width - the bar width
- margin - the bar margin
- minHeight - the minimal height
- origin - the scale origin
- itemCss - the bar css
- scale - the maximum scale value
- color - the bar color
- negativeColor - the color of the bars below the X scale
- horizontal - the horizontal bars
Area sparkline settings
- paddingX - the left and right padding
- paddingY - the top and bottom paddings
- radius - the point radius
- eventRadius - the radius of a clickable area around the point
- minHeight - the minimal height
- css - the custom CSS class for the sparkline
- color - the line color
Pie sparkline settings
- paddingY - top and bottom paddings
- css - a custom CSS class for the sparkline
- color - the pie color
- donut - the pie chart with a round empty space inside
- innerRadius - the radius of the round empty space inside a chart
Spline sparkline settings
- paddingX - the left and right padding
- paddingY - top and bottom paddings
- radius - the point radius
- eventRadius - the radius of a clickable area around the point
- minHeight - the minimal height
- css - a custom CSS class for the sparkline
Radar sparkline settings
- padding - left, right, top and bottom paddings
- radius - the point radius
- eventRadius - the radius of a clickable area around the point
- color - the line color
- css - a custom CSS class for the sparkline
Setting Sparklines Colors
There are two variants of configuring sparklines colors using the color property:
- to set a custom color for sparklines
{
    id:"income",
    header:"Custom color",
    template: webix.Sparklines.getTemplate({
        type:"area", color: "#5868bf"
    }),
    width:200
}
- to specify different colors of sparklines for datatable rows
var bar1 = webix.Sparklines.getTemplate({
    type:"bar", color: "#5868bf"
});
var bar2 = webix.Sparklines.getTemplate({
    type:"bar", color: "#3ea4f5"
});

...

{
    id:"income",
    header:"Row color",
    template: function(obj,type,data,column,index){
        var template = (index%2 ? bar1 : bar2);
        return template.apply(this, arguments);
    },
    width:200
}
Negative color option for Bar sparklines
You can set a certain color for a negative value while rendering a Bar sparkline. It is set by the negativeColor property:
{
    id:"income",
    header:"Negative color",
    template: webix.Sparklines.getTemplate({
        type:"bar", negativeColor: "#d86c79"
    }),
    width:200
}

Sparklines Outside of DataTable
You can also use sparklines separately, not just in datatable cells. For example, you can place them into the List view:
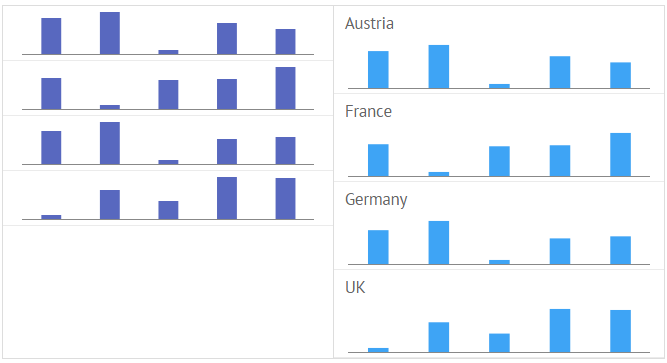
For this purpose, you need to create a template function for a sparkline and use it in a list template. As well as any other template, sparkline template function returns an HTML string. It takes two parameters:
- data - data collection for rendering
- type - an object that contains size properties ("width" and "height")
If each list item contains only a sparkline, you can set a sparkline template as a list template. In this case sparklines will take the sizes of list items:
var sparkline = webix.Sparklines.getTemplate({type:"bar", color: "#5868bf"});

webix.ui({
    view:"list",
    template: sparkline,
    type:{ height: 50, width:300 },
    data: [
        {id: 1, data: [710, 780, 390, 660, 600] },
        {id: 2, data: [810, 500, 780, 800, 940] },
        ...
    ]
});
Sparkline template can also be used inside of a list template. In this case you need to pass data and object with sizes into the sparkline template:
var sparkline = webix.Sparklines.getTemplate({type:"bar", color: "#5868bf"});

webix.ui({
    view:"list",
    type:{ height: 80, width:300 },
    template:function(obj){
        return obj.name + "<div style='height:50px'>" +
            sparkline(obj.data, { width:300, height: 50 }) + "</div>";
    },
    data: [
        {id: 1, name: "Austria", data: [710, 780, 390, 660, 600] },
        {id: 2, name: "France", data: [810, 500, 780, 800, 940] },
        ...
    ]
});
Related sample: Sparklines Outside of Datatable
Back to top