Vue JS Integration
Webix provides the possibility of integration with Vue JS framework.
The sources for integration of Webix with Vue JS are not included into the Webix library package. You can take them from the GitHub repository
Overview
There are two good use-cases, when such kind of integration will be useful:
- you have a Vue-based app, where you want to place one or a few widgets (datatable, chart, spreadsheet, etc.)
- you want to use a VueJS app inside of Webix UI (reactive templates, custom forms, etc.)
We advise you against using Vue.js as an MVC framework for developing a Webix-based applications, since there are obvious pitfalls.Webix widgets won't adjust size to Vue layouts, and such an approach adds too much overhead for not so many benefits.
Instead, we highly recommend you to use the Webix Jet framework for building web apps with Webix, as it is native for the library and will help you to manage the development stages in the most natural way.
To achieve the Vue+Webix integration we provide the following tools:
- webix-ui component for Vue based apps
- view:"vue" for Webix based apps
- set of ready-made Vue+Webix Form controls
If it's not enough, you can create a custom component by wrapping a Webix widget into a Vue component.
Included Files
Pay attention that the discussed integration isn't included into Webix library. To start using it in your project, you need to take the necessary sources from GitHub. Besides, they are available from CDN.
You need to include the link to the Vue source file in the head of your HTML page:
<script type="text/javascript"
    src="https://unpkg.com/vue@3/dist/vue.global.js"></script>
Then include Webix JS and CSS files, for example from CDN:
<script type="text/javascript" src="//cdn.webix.com/edge/webix.js"></script>
<link rel="stylesheet" type="text/css" href="//cdn.webix.com/edge/webix.css">
In order to use specific integration features, you also need to include the following source files:
<!--for using a Webix widget in a Vue app-->
<script type="text/javascript" src="//cdn.webix.com/libs/vue/3/webix-ui.js"></script>
<!--for using a Vue component in a Webix app-->
<script type="text/javascript" src="//cdn.webix.com/libs/vue/3/vue-view.js"></script>
<!--for using ready-made Vue+Webix controls-->
<script type="text/javascript"
    src="//cdn.webix.com/libs/vue/3/webix-controls.js"></script>
Creating Vue Application with a Webix Widget
If you are going to implement a large-scale application with Vue.js, it may require hard work with various data. In this case powerful Webix data widgets will help you to deal with it.
Initializing Webix View in a Vue App
To begin with, don't forget to include the necessary source files.
Next, to add a Webix widget into a Vue-based app, you need to complete the steps below:
1. Create a Vue app.
2. Use the tag < webix-ui > inside of the Vue template to define a Webix widget.
3. Specify an object with the Webix UI configuration inside of the data object of the Vue instance.
4. Bind the "config" attribute of < webix-ui > to the data object that contains the UI configuration via the v-bind directive.
Let's consider an example. We have a layout with two columns. The first column contains a Calendar view and the second one - a List view with data. The layout config is described in the "ui" object. So, we will bind this object to the config attribute of the < webix-ui > element located in the Vue template:
const app = Vue.createApp({
  template: `
    <div style="width:400px; height: 350px;">
        <h3>1. Building UI</h3>
        <webix-ui :config='ui'/>
    </div>
  `,
  data() {
    return {
      ui: {
        cols: [
          {
            view: "calendar",
          },
          {
            view: "list",
            select: true,
            data,
          },
        ],
      },
    };
  }
});

app.component(...); // init webix-ui component

app.mount("#demo1");
The result is presented in the image below:
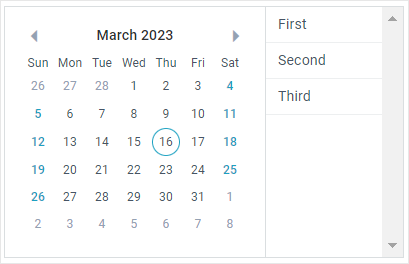
Related sample: Building UI
Data Binding
It's possible to bind data of a Webix widget and a Vue template. For this, you just need to use a common Vue technique: the v-bind directive.
In the following example, we will add a Webix DataTable widget to a Vue app. Also we will add a button that clears the data in the datatable on click:
const app = Vue.createApp({
    template: `
      <div style="width:400px; height: 250px;">
          <h3>2. One way data binding,
              <button v-on:click="data=[]">Clear</button>
          </h3>
          <webix-ui :config='ui' v-bind:modelValue='data'/>
      </div>
    `,
    data() {
      return {
        data,
        ui: {
          view: "datatable",
          autoheight: true,
          select: "row",
          columns:[
              {
                id: "value",
                header: "Section Index"
              },
              ...
          ]
        }
      };
    }
});

app.component(...); // init webix-ui component

app.mount("#demo2");
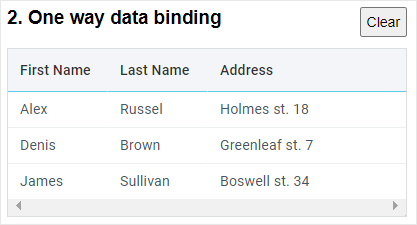
The < webix-ui > element gets the datatable configuration and is loaded with the related data.
The Clear button inside the template listens to the event click via the v-on directive. When the button is clicked, this event fires and cleans data in the datatable.
This is how our small app looks like after initialization:
and on the Clear button click:
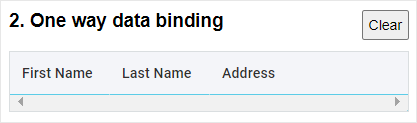
Related sample: One-way Data Binding
Implementation Details
The way how component will try to parse incoming value depends on component. The top level widget of webix-ui block will try to call the parse/setValues/setValue method if such method exists. Additionally, for all webix widgets in the block, the "onValue" event will be triggered, so you can define a custom value handler (check the sample further).
Two-way Data Binding
You can also implement two-way data binding. It means that if you change something in a Vue component, the corresponding changes will be made in the bound Webix widget and vice versa. The regular v-model Vue directive can be used for this task.
For example, we can create a Vue template with an input element and add a < webix-ui > element that will render a Webix Layout with a Slider inside. If a value will be changed in an input or in a slider, it will be modified in the other component correspondingly. Let's see how we can implement this use case:
const app = Vue.createApp({
  template: `
    <div style="width:400px; height: 250px;">
      <h3>3. Two-way data binding, try to change <input v-model.number='result'></h3>
      <webix-ui :config='ui' v-model.number='result'/>
    </div>
  `,
  data() {
    return {
      result: 50,
      ui: {
        margin: 20,
        rows: [
          {
            view: "template",
            type: "header",
            template: "Webix UI",
          },
          {
            view: "slider",
            label: "Change me",
            labelWidth: 120,
            inputWidth: 300,
            value: 50,
            on: {
              onChange() {
                this.$scope.$emit("update:modelValue", this.getValue());
              },
              onValue(value) {
                this.setValue(value);
              },
            },
          },
        ],
      },
    };
  }
});

app.component(...); // init webix-ui component

app.mount("#demo3");
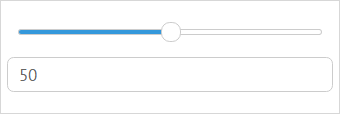
The result is presented in the image below:
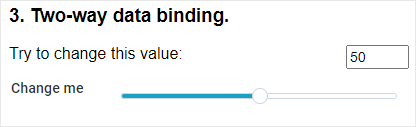
We've bound the result data attribute both to the input and the slider elements.
When the v-model bound value is modified, the onValue event fires in the Webix view. When the value of the Slider view is changed, its native event onChange fires and informs Vue about value change.
The declaration this.$scope inside of the onChange event handler points to the < webix-ui > element, i.e. on a Webix view as a Vue component.
Related sample: Two-way Data Binding
Creating Webix Application with a Vue Template
You can make use of a Vue reactive template inside of a Webix-based application. We added view:"vue" widget specifically for this purpose. This view presents a Vue template that can be used as a native Webix widget.
The only thing you need to do in order to use it in your app is to include the corresponding JS file.
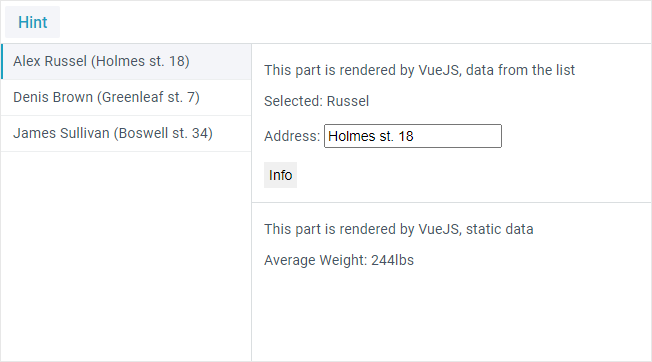
Let's consider the following example. We have a Webix Layout with a List view and want to display an item data in a template depending on the selected List item.
The code sample below shows how a Webix List and a Vue template can be bound:
const list = {
  view: "list",
  id: "list",
  select: true,
  template: "#value# (#size#)",
  data: [
      { id: 1, value: "Record 1", size: 92 },
      ...
  ]
};

const preview = {
    view: "vue",
    id: "preview",
    template: `
      <div>
          <p>This part is rendered by VueJS, data from the list</p>
          <div v-if='value'>
              <p>Selected: </p>
              <p>Size: <input v-model='size'></p>
          </div>
      </div>
    `,
    data: {
      value: "",
      size: ""
    },
    watch: {
      size(value) {
          $$("list").updateItem($$("list").getSelectedId(), { size: value });
      }
    }
};

$$("preview").bind("list");
This is how it works:
- the data object receives the value taken from the selected item of List
- the watch property monitors when size changed inside of Vue component and updates data in the list
The result can be used in an application as follows:
Related sample: view:"vue" in a Webix App
Creating a Custom Vue+Webix Component
You can create a custom component by wrapping a Webix widget in a Vue component and use it as a native Vue template. This case is rather useful when the same UI is reused throughout an application. It will help you to keep all the used data together.
For example, we have an input and a slider. We want them to update their values simultaneously.
Before getting to work, don't forget to include the necessary source file.
After that you need to take the following steps:
1) register a global Vue component using app.component(name,options):
You can find the details on registration of new components in the Vue.js documentation.
We will name our custom component "my-slider". So, the initial code for a component registration will look as follows:
const app = Vue.createApp({ ... });

app.component("my-slider", {
  // component config options
});
2) specify the necessary Vue configuration options for the component
The full list of options is given in the Vue.js API.
We will use the following options for our Slider control:
- props - declares a list/hash of attributes that are exposed to accept data from the parent component
- template - string template to be used as the markup of the new component
- watch - monitors changes in the data of one of the bound components and applies necessary updates in the second one
- mounted - a function which is called when a new component has just been mounted
- unmounted - a function which is called after a component has been unmounted
The full code of a component registration will look like this:
app.component("my-slider", {
  props: ["modelValue"],
  // always an empty div
  template: "<div></div>",
  watch: {
    // updates component when the bound value changes
    value: {
      handler(value) {
        webix.$$(this.webixId).setValue(value);
      },
    },
  },
  mounted() {
    // initializes Webix Slider
    this.webixId = webix.ui({
      // container and scope are mandatory, other properties are optional
      container: this.$el,
      $scope: this,
      view: "slider",
      value: this.modelValue,
    });

    // informs Vue about the changed value in case of 2-way data binding
    $$(this.webixId).attachEvent("onChange", function() {
      var value = this.getValue();
      // you can use a custom event here
      this.$scope.$emit("update:modelValue", value);
    });
  },
  // memory cleaning
  unmounted() {
    webix.$$(this.webixId).destructor();
  },
});
The mounted() function will create a new instance of a Webix Slider.
The unmounted() function will unmount the Webix Slider instance when it is no longer needed.
3) use the registered component in the Vue component's template as a custom element
const app = Vue.createApp({
  template: `
  <div style='width:300px;'>
      <h3>Vue + Webix: Custom UI</h3>
      <my-slider v-model.number='progress' />
      <div><input type="text" v-model.number='progress' /></div>
  </div>
  `,
  data: {
    progress: 50,
  },
});

app.component("my-slider", { ... });

app.mount("#demo1");
We put a Webix-based slider created above into the Vue component's template.
Also we bound the "progress" data attribute both to the slider and the input elements. Thus, when its value changes, both controls will update their values correspondingly.
Related sample: Vue+Webix Custom UI
Ready-made Webix Form Controls
If you don't want to wrap a Webix widget into a Vue template by yourself, we have prepared a set of ready-made Webix Form Controls wrapped in Vue. The available controls are:
- < webix-text >
- < webix-datepicker >
- < webix-colorpicker >
- < webix-slider >
- < webix-select >
- < webix-richselect >
- < webix-combo >
- < webix-multicombo >
- < webix-radio >
- < webix-segmented >
- < webix-tabbar >
- < webix-textarea >
- < webix-checkbox >
To use integrated Form controls in a Vue app, you need to include the above-mentioned source file -
webix-controls.js.
After that you can use any of the Vue-wrapped Webix Form Controls in a Vue application as in the code below:
const app = Vue.createApp({
  template: `
    <div style='width:500px'>
        <fieldset>
            <legend>User</legend>
            <webix-text         label='First Name'  v-model.string='fname' />
            <webix-text         label='Last Name'   v-model.string='lname' />
            <webix-datepicker   label='Birthdate'   v-model.date='birthdate' />
            <webix-colorpicker  label='Color'       v-model.string='color' />
            <webix-slider       label='Level'       v-model.number='level' />
        </fieldset>
    </div>
  `,
  data: {
    fname: "Reno",
    lname: "Abrams",
    birthdate: new Date(1992, 10, 24),
    color: "#aaaff0",
    level: 20,
  },
});

app.component(...) // register controls

app.mount("#demo1");
It will provide the following result:
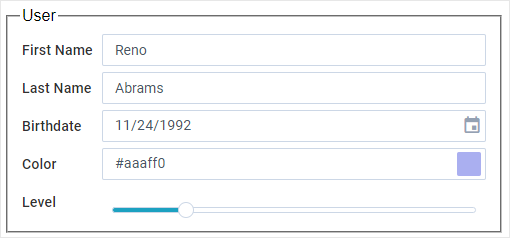
Related sample: Vue+Webix Form Controls
In case you are still interested in creating your own custom Vue component with Webix widget inside, read the section Creating Custom Vue Component.
Back to top