Available only in PRO Edition
Grid Layout
Since 5.1
The widget is available in the Webix Pro edition.
API Reference
Overview
Webix GridLayout widget makes it easier for you to build a graceful and balanced page structure. It gives you a ready scheme for arranging elements, thus saving your time in creating a nicely organized web application.
GridLayout is based on Webix Layout and possesses the idea of arranging content from DataTable. It divides a page into rows and columns and uses grid cells for aligning views in the layout. Besides, it provides the possibility to save and restore the state of elements on a page.
Initialization
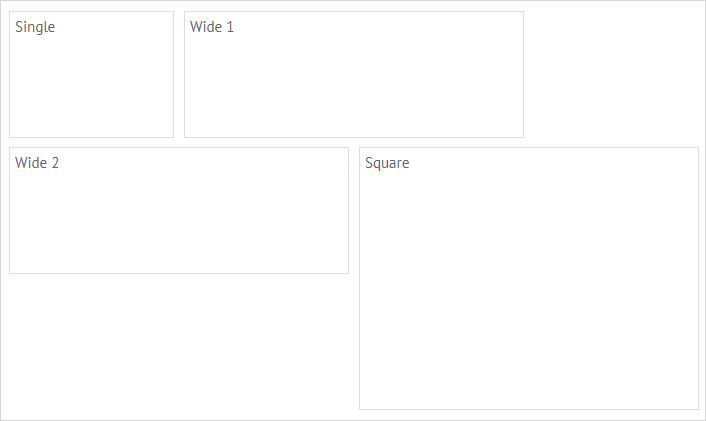
To initialize GridLayout on a page, make use of the code below:
webix.ui({
    view:"gridlayout",
    gridColumns:4,
    gridRows:3,
    cells:[
        { template:"Single", x:0, y:0, dx:1, dy:1 },
        { template:"Wide 1", x:1, y:0, dx:2, dy:1 },
        { template:"Wide 2", x:0, y:1, dx:2, dy:1 },
        { template:"Square", x:2, y:1, dx:2, dy:2 }
    ]
});
Main properties
- gridColumns - (number) the number of columns for the grid
- gridRows - (number) the number of rows for the grid
- cellHeight - (number) the height of a cell in pixels
- cellWidth - (number) the width of a cell in pixels
- margin - (number) defines the space around elements
- padding - (number) defines the space between the layout borders and content
- paddingX - (number) sets the right and left padding
- paddingY - (number) sets the top and bottom padding
GridLayout contains a set of cells, each of which presents an object with the properties that define the content, location and size of a cell. Each cell can contain a template or a view inside. The list of available cell properties is given below:
- x - (number) the x-index of a grid cell starting point
- y - (number) the y-index of a grid cell starting point
- dx - (number) the width of a view defined as a number of grid cells
- dy - (number) the height of a view defined as a number of grid cells
Configuring GridLayout
GridLayout provides a range of configuration options that will help you to achieve the desired look and feel.
Configuring the grid
By default, the grid of GridLayout includes 2 grid rows and 2 grid columns. You can change these grid settings via the gridRows and gridColumns options:
webix.ui({
    view:"gridlayout",
    gridColumns:4,
    gridRows:3,
    cells:[
        { template:"Single", x:0, y:0, dx:1, dy:1 },
        { template:"Wide 1", x:1, y:0, dx:2, dy:1 }
        // more cells
    ]
});
Setting the size of a cell
You can specify the necessary width and height of grid cells in pixels via the cellHeight and cellWidth options:
webix.ui:({
    view:"gridlayout",
    id:"grid",
    gridColumns:4, gridRows:3,
    cellHeight: 150, cellWidth: 200,
    cells:[
        { id:"a", template:"Single", x:0, y:0, dx:1, dy:1 },
        { id:"b", template:"Wide 1", x:1, y:0, dx:2, dy:1 }
        // more cells
    ]
});
Setting margin and padding for cells
You can define proper margin and padding values to get the necessary alignment of cells in the grid. By default, the value of both margin and padding is 10.
It is also possible to change the horizontal and vertical padding separately with the help of the paddingX and paddingY properties.
webix.ui({
    view:"gridlayout",
    gridColumns:4, gridRows:3,
    margin:20,
    // paddingY:20
    padding 20,
    cells:[
        { template:"Single", x:0, y:0, dx:1, dy:1 },
        { template:"Wide 1", x:1, y:0, dx:2, dy:1 },
        // more cells
    ]
});
Working with Views
GridLayout provides a set of API methods to operate the inner views. You can add/remove views and move them to new positions.
Adding/deleting views
You can add a new view into a gridlayout via the addView method. It may take two parameters:
- view - (object) the configuration of the new view
- index - (number) optional, the index a new view will be added at
$$("grid").addView({ template:"Column", x:1, y:1, dx:1, dy:1 });
Related sample: Grid Layout API
To remove an unnecessary view, apply the removeView method. It takes either a child view object or its id as an argument:
webix.ui({
    view:"gridlayout",
    id:"grid",
    cells:[
        { id:"a", template:"Single", x:0, y:0, dx:1, dy:1 },
        { id:"b", template:"Wide 1", x:1, y:0, dx:2, dy:1 }
        // more cells
    ]
});

$$("grid").removeView("a");
Related sample: Grid Layout API
You can also remove all views from a gridlayout with the help of the clearAll method:
$$("grid").clearAll();
Related sample: Grid Dashboard - Saving State
Moving views
To change the location and sizes of a view, make use of the moveView method. You need to pass two parameters to it:
- id - (string|number) the id of a view
- view - (object) an object with the view configuration
$$("grid").moveView("d", { x:0, y:0, dx:2, dy:2 });
Related sample: Grid Layout API
Saving and Restoring State
Webix GridLayout enables you to store/restore the state of a layout to a cookie, a local or session storage.
For these needs you should store the configurations of all widgets within gridlayout cells to recreate them multiple times.
var widgets = {
   view:"list", id:"list",
   width:200,
   drag:true,
   template:"#value# - (#dx#x#dy#)",
   data:[
      { id:"a", value:"Widget A", dx:1, dy:1 },
      { id:"b", value:"Widget B", dx:1, dy:2 },
      { id:"c", value:"Widget C", dx:2, dy:1 },
      // other cells
   ]
};

webix.ui({
    type:"space", cols:[
        { view:"scrollview", body:grid },
        widgets
    ]
});
Then you can initialize gridlayout using these configuration objects with the help of the function defined by the factory configuration option. It takes one parameter:
- obj - (object) the configuration object of the view
webix.ui({
    view:"gridlayout",
    id:"grid",
    gridColumns:4, gridRows:4,
    factory:function(obj){
        // your logic here
    }
});
After that you are ready to work with the gridlayout state.
Saving the current state
To save the current state of a gridlayout to the local storage, you should call the serialize method as in:
var state = $$("grid").serialize(serializer);
webix.storage.local.put("grid-dashboard-state", state);
As a parameter the serialize() method may take the serializer function that contains the serialization logic of each particular component within a gridlayout body.
Restoring the saved state
To recreate the cells content, you need to get the state object by its name from the storage and call the restore method of GridLayout. It takes two parameters:
- state - (object) a state object
- factory - (function) a function that implements the logic of creating gridlayout cells
var state = webix.storage.local.get("grid-dashboard-state");
$$("grid").restore(state,factory);
The factory function declared above implements the logic of creating cells. It will return a view from the existing configuration (here configurations are stored in the widgets object) to which it will point by the id.
Related sample: Grid Dashboard - Saving State
Catching Views Changing
You can catch changes made in a gridlayout, such as adding, removing or moving of views and handle them with the help of the onChange event handler.
$$("grid").attachEvent("onChange",function(){
    // webix.message("A view has been moved")
});