Arranging Blocks
From this article you will learn how to position diagram blocks automatically as well as set blocks coordinates manually.
Auto Placement
Autoplacement is based on the complex calculations that allow you to position blocks in a most appropriate and neat way whether they are in hierarchical or cyclic relations.
Blocks are distributed automatically according to their relations defined in the links array.
Enabling auto placement
Autoplacement is enabled by default and can be controlled via the configuration autoplace property.
webix.ui({
  view: "diagram",
  root: "blockId",
  // optional, as it is the default state
  autoplace: true
});
The root property defines the origin from which auto-branching starts. If the root is not specified, Diagram will define it itself.
You can autoplace blocks anytime by calling the autoPlace method:
$$("diagram1").autoPlace();

// or, with a root item id
$$("diagram1").autoPlace("blockId");
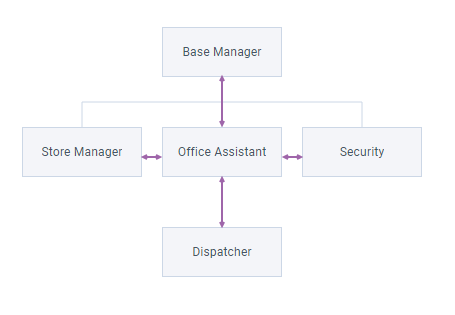
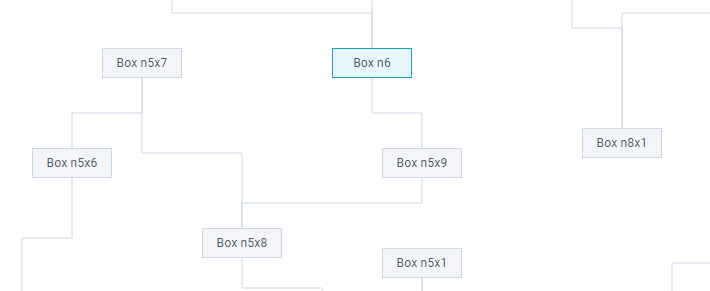
The basic example of auto placement is represented on the picture below:

Note that if auto placement is enabled, the following operations will trigger the autoplacement:
- adding/updating/deleting
const diagram = $$("diagram1");

//add block
diagram.add({id: newId});
//if needed, link it to any existing one
diagram.getLinks().add({source:blockId, target:newId});
Related sample: Diagram: CRUD Operations
- sorting and filtering
{view:"search", placeholder:"Type to search", width:700, on:{
  onTimedKeyPress:function(){
    const value = this.getValue().toLowerCase();
    // filter blocks according to entered values
    $$("diagram1").filter("value", value);
  }
}}
Related sample: Diagram: Filtering Items
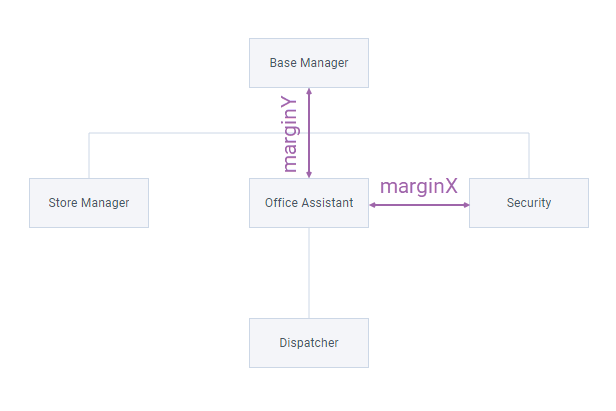
Defining margins between blocks
You can control auto placement by defining margins around blocks. The logic will count these values while arranging elements. The set of properties includes:
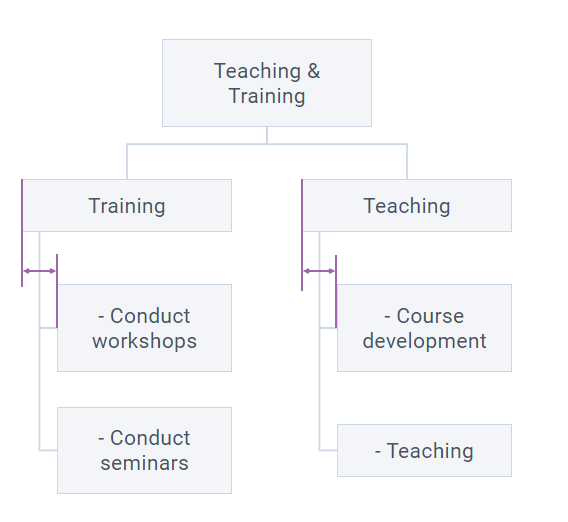
- margin (number) - defines a minimal margin around the blocks. Is measured between the block centers
- marginX (number) - defines a horizontal margin for data with hierarchical structure
- marginY (number) - defines a vertical margin for data with hierarchical structure. By default, it is defined as a maximum value from block width and height plus margin. So sometimes you will need to provide a negative value for it
- listMarginX (number) - defines margin between side edges of a parent and its children for elements arranged as a list block.
You can define margins globally via the item property:
{
  view: "diagram",
  item: {
    marginX: 50,
    marginY: -20
  }
}
Related sample: Diagram: Margins with Autoplace
margin
marginX and marginY
listMarginX
Keep in mind that these margins are only applicable, if autoplace is enabled.
Defining margins between graphs
In case you have several independent graphs (e.g. trees that do not share a common root), you can control margin between them via the treePadding property.
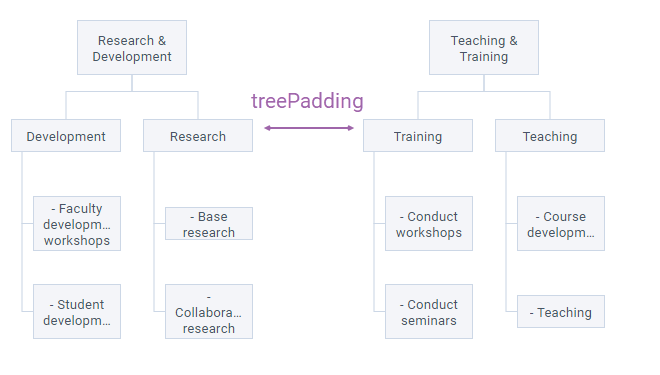
webix.ui({
  view:"diagram",
  root:"root",
  treePadding: 150,   // ...
});
Related sample: Diagram: Autoplacement with Several Graphs
Fixed Coordinates
If you need a high precision while arranging blocks you can disable auto placement and position them manually via the x and y properties of the data item objects that define the top left position of each item. The calculation starts from the top left corner of the widget (0, 0).
Note that links will be placed according to block positions unless you define fixes coordinates for the links themselves.
view:"diagram",
autoplace:false, // blocks set
data: [
  { id: "n1", x: 800, y: 320 },
  { id: "n2", x: 800, y: 500 },
  { id: "n3", x: 1000, y: 500 },
]
Related sample: Diagram: Fixed Positioning
Link Labels Positioning
There is a particular type of block - label for links. For this type, the position is set relative to the position of the link to which the label is attached. Read here for more details.
Back to top