Binding Uploader to Any Page Element
Webix Uploader can exist not only in the form of a button that you press to start the upload process. It can be bound to any page element and any page event can be used to call the uploader.
All you need is to take the following steps:
1. Set an uploader invisible, or apiOnly.
2. Use uploader API to handle the uploading process.
Initializing
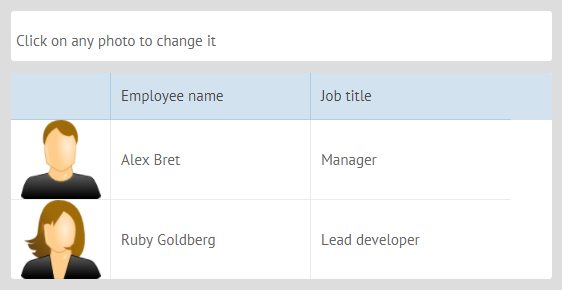
Related sample: Invisible Uploader for Datatable
Such uploader can be used with data management components (datatable in particular) and allows uploading pictures on the fly.
Initialization
// app initialization
webix.ui({
    view:"datatable",
    // the datatable configuration
});

// uploader initialization
webix.ui({
    view:"uploader",
    id:"uploadAPI",
    apiOnly: true,
    upload:"php/photo.php"
});
Uploader is initialized with a separate webix.ui() call.
Tuning Upload Process
Uploading is controlled through the view and uploader events. (Event Handling is described separately):
View Events
For the 'visible part' you should define the event that starts the uploading. In the above-mentioned datatable, clicking any photo should enable file browsing dialog on your machine.
The file dialog is triggered by the same-name method that is applied to the uploader object and takes the upload context hash as a parameter. You will be able to use the context object later to reflect upload result on client.
webix.ui({
    view:"datatable",
    on:{
        onItemClick:function(id){
            if (id.column == "photo")
                $$("uploadAPI").fileDialog({ rowid : id.row });
        }
    }
});
Uploader Events
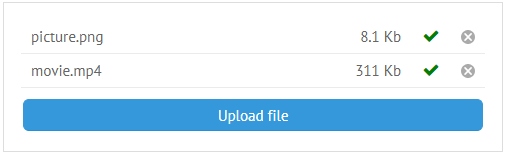
- onBeforeFileAdd - fires before file is added to the uploader and uploaded (if autosend is enabled). On this event file filtering should be done to prevent uploading of files with undesired formats and sizes;
- onAfterFileAdd - fires after a file has been added to the uploader body;
- onFileUpload - fires after the file has been fully uploaded. On this event the component should be refreshed with a newly uploaded image;
- onFileUploadError - fires in case an error happens during uploading (status error comes with the server response);
- onUploadComplete - triggers when file upload is successfully completed.
See other events in the Uploader API Reference.
webix.ui({
    view:"uploader",
    //configuration
    on:{
        onBeforeFileAdd:function(item){
            var type = item.type.toLowerCase(); //deriving file extension
            if (type != "jpg" && type != "png"){ //checking the format
                webix.message("Only PNG or JPG images!");
                return false;
            }
        },
        onFileUpload:function(item){
            var id = item.context.rowid;
            var row = $$("people").getItem(id);

            row.photo = item.sname;
            $$("people").updateItem(id, row);
        }
    }
});
Comments:
- item.type returns file extension;
- item.sname returns file name under which it was saved on server;
- item.context is uploader context previously set by fileDialog() method. item.context.rowid returns the ID of the dedicated row in datatable.
Look for more item properties in the main Uploader article.
Data Collection Events
Note that you can use the events of the Uploader files data collection that stores all the files added into Uploader. For example:
$$("uploader").files.attachEvent("onAfterDelete", function)(){
  // your logic here
};
See the full list of the data collection events in the related section of API Reference.
Using ApiOnly uploader for Drag-n-Drop
Uploader initialization:
webix.ui({
    view:"uploader",
    id:"uploadAPI",
    apiOnly: true,
    upload:"php/photo.php"
 });
Defining drop area
If you want to drag-and-drop files with the apiOnly uploader, you should define the desired drop area by the addDropZone method, e.g.:
- drop to any HTML element of the page:
$$("uploadAPI").addDropZone(document.getElementById("uploader_container"));
- drop to HTML element of any Webix Component:
//$view contains the object of the topmost element of the component
 $$("uploadAPI").addDropZone($$("mylist").$view);
Then, all the files dropped to the area will be added to uploader files and, if autosend is not canceled, will be sent to the server script.
Displaying the files
Additionally, you need to take care of the way the files should be displayed. For Webix List there's a ready-made solution:
First, you define the uploader type for the list:
{ view:"list", id:"mylist", type:"uploader" }
Then, link to it in the uploader configuration. You should mention the list ID:
{ view:"uploader", id:"uploadAPI", link:"mylist" }
Related sample: Drag-and-Drop with Invisible Uploader
Check uploader display modes for details.
For other Webix components as well as for on-page HTML elements you should provide a custom logic.
Back to top