Uploading Files
Files are uploaded with the help of a dedicated UI component called uploader.
Related sample: Basic List Uploader
Webix Uploader inherits from view and looks like a standard Webix button you need to click to start uploading.
You can also make the button invisible and start file uploading dialog on any page event.
Uploader Initialization
Uploader is normally initialized together with a UI component to display values of pre-uploaded and uploaded files. Such a component (it may be a list or a template, etc.) is called uploader body and is initialized separately. To link it to the uploader, specify its ID as a value of the uploader link property.
webix.ui({
    view:"form",
    rows:[
        {
            view:"uploader",
            id: "uploader1",
            value:"Upload file",
            link:"mylist",
            upload:"//docs.webix.com/samples/server/upload",
            datatype:"json"
        },
        {
            view:"list",
            id:"list1",
            type:"uploader",
            autoheight:true,
            borderless:true
        }
    ]
});
Uploader Properties:
- the uploader ID should be specified in case you are going to work with it later
- value (string) - a text value of the uploader button
- link (string) - the ID of a component that will display values of chosen files
- upload (string) - a path to a script file that will handle uploading
- multiple (boolean) - true by default. If set to false, it specifies that a previously added file will be removed and replaced with a new one, for uploading only one file at a time
- autosend (boolean) - true by default. If set to false, it cancels on-the-go file processing. The files are added to the uploader body only. They can be sent to a server by calling the send() method later on
- datatype (string) - the type of a server-side response. Optional, json by default.
Read more about uploader configuration and the server script.
Uploader Display Modes
The library offers Webix list as a default component to show properties of uploaded files. You can as well initialize any Webix component for these needs provided that you specify an appropriate template for it.
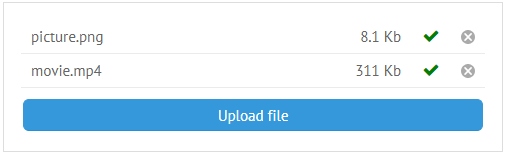
List Uploader
Set to type:"uploader", a list shows the following file info:
- the file name
- the file extension
- the file size
- the Cancel icon
- the "Upload Ready" icon (isn't shown initially in the autosend:false mode).
You can create a custom type for list items as well. It's described in the Uploader Progress Bar article.
Template Uploader

To make template display file properties, you should define a function template to form a string to display.
In the snippet below, a template shows a string comprised of file names joined together with a comma.
view:"template",
template:function(data){
    var names = [];
    if (data.each)
        data.each(function(obj){  names.push(obj.name);  });
        return names.join(", ");
}
Related sample: Template Uploader
Template uploader is really good for attaching files to some message.
Manipulations with Files
The properties of the uploaded files are stored in the uploader files Data Collection that contains an object of file objects.
To get to all files currently added to the uploader body, apply the following code:
// "uploader1" - uploader ID
$$("uploader1").files.data.pull;
The line returns an object with uploaded data items (files). Each file item contains information about its size, type, status, etc.
Each file object includes:
- file - the File object
- id - the file ID generated automatically with the webix.uid() method per each uploading session
- name - the file title and extension
- percent - the percent of the file size that has been uploaded
- progress - the progress of the file upload (same as precent)
- type - the file extension only
- sizetext - the size of the file (as a string like 522Kb)
- size - the size of the file in bytes (as a number)
- status - the upload status that changes during uploading:
- "client" - the file is added to the uploader body on the client side, the uploading hasn't been started yet or was aborted by a user
- "transfer" - the file uploading is in progress
- "server" - the file has been successfully uploaded
- "error" - an error occurred during uploading.
- context - the object the uploader is connected with.
Items IDs are random numbers. They can be retrieved with the getFirstId(), getLastId(), and getNextId() methods.
Getting Each File Object
A file object can be retrieved by the getItem method with the ID of a necessary item as a parameter:
var file_id = $$("uploader1").files.getFirstId(); // getting the ID
var fileobj = $$("uploader1").files.getItem(file_id).file; // getting file object
filename = $$("uploader1").files.getItem(file_id).name; // getting properties
//or
filename = fileobj.name;
Webix offers rich API to manipulate with the files collection and each file object. For instance, you can:
$$("uploader1").files.parse(); // parse JSON data into the files collection

$$("uploader1").files.getFirstId(); // get IDs of the first and last elements from the collection
$$("uploader1").files.getLastId();

$$("uploader1").files.getNextId(id); // get ID of the next file relative to the specified one

$$(this.config.uploader).files.remove(id); // remove the specified file
Note that when you parse JSON string to the files object, no files are actually added to the uploader!
$$("uploader1").files.parse([
    { name:"cover.jpg", sizetext:"54kb", status:"server" },
    { name:"page01.jpg", sizetext:"122kb", status:"server" },
    { name:"page02.jpg", sizetext:"142kb", status:"server" }
]);
Related sample: Adding Files by API
You can get file names simpler, with the dedicated getValues() method applied to the form that contains this uploader. The method returns the name property of each file joined into a comma-separated string.
webix.ui({
    view:"form", rows: [
        { view: "uploader", name:"records"},
        { view:"button", click: function() {
            var text = this.getParentView().getValues();
            text = JSON.stringify(text, "\n");
            webix.message("<pre>"+text+"</pre>");
          }
        }
    ]
});
Related sample: Template Uploader
Treating File Items in a Cycle
Canceling uploading of several files at once:
function cancel(){
    var id= $$("uploader1").files.getFirstId();
    while(id){
        $$("uploader1").stopUpload(id);
        id = $$("uploader1").files.getNextId(id);
    }
}
Defining a function to execute on file uploading. The each() method iterates through all file objects of Uploader and gives access to all file object properties. It also gives access to the current file index in the file list (indexes are zero-based).
$$("uploader1").files.data.each(function(obj,index){
    if (obj.status === "server") {
        // do smth
    }
});
An array of files can be treated by the files order as well:
var order = $$("uploader1").files.data.order;
for (var i=0; i < order.length; i++){
    if ($$("uploader1").files.getItem(order[i]).status === "server") {
        // your code here
    }
};
Uploader Events
Here are the main events that allow customizing the uploader behavior. The full event system is to be found in the API reference.
- onBeforeFileAdd - triggers on adding a file to the uploader menu
- onAfterFileAdd - fires after a file has been added to the uploader body
- onFileUpload - fires when uploading of a file ends successfully
- onFileUploadError - fires in case of a server-side error during uploading
- onUploadComplete - triggers when file upload is successfully completed.
Confirming Uploading
$$("uploader1").attachEvent("onUploadComplete", function(){
    webix.message("done");
});
Data Collection Events
Note that you can also use the events of the Uploader files data collection that stores all the files added into Uploader. For example:
$$("uploader1").files.attachEvent("onAfterDelete", function() {
  // your code here
});
See the full list of the data collection events in the related section of API Reference.
Related Articles
- Configuring Uploader
- Managing Server Part of Uploading
- Creating a Progress Bar for Uploaded Files
- Uploader and Form Integration
- Binding Uploader to Any Page Element
- Api Reference - Uploader Methods, Properties and Events
- Uploader CSS Image Map