How-tos
You can read about general customization rules in the corresponding article.
Filtering Reports List
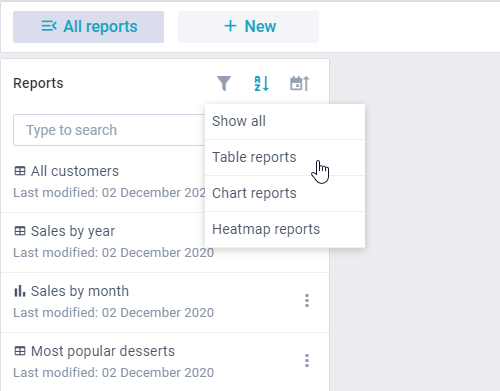
1. Create a custom class (CustomModules) by inheriting it from the default reports.views["modules"]. Inside the config method add a button that triggers filtering:
class CustomModules extends reports.views["modules"] {
    config() {
        let ui = super.config();
        const newButton = {
            view: "icon",
            localId: "myFilterIcon",
            icon: "mdi mdi-filter",
            click: e => this.showMyPopup(e),
        };

        /* add new icon button */
        ui.rows[0].cols.splice(2, 0, newButton);
        return ui;
    }
}
2. Define the getMyPopupConfig method that returns a popup with filtering options:
//...inside CustomModules class
getMyPopupConfig() {
    return {
        view: "popup",
        body: {
            view: "list",
            borderless: true,
            css: "webix_rpt_popup_menu",
            width: 160,
            autoheight: true,
            template: "#value#",
            data: [
                { id: "all", value: "Show all" },
                // other options
            ],
            click: (id, e) => this.myFilter(id, e),
        },
    };
    }
3. To implement filtering logic itself create the myFilter method that filters reports according to their types:
// list filtering by report type
myFilter(id) {
    if (id == "all") this.$$("list").filter();
    else
        this.$$("list").filter(module => {
            const config = module.parsed;
            return config.type == id;
        });
    this.MyPopup.hide();
}
4. Define the showMyPopup method to show the popup with filtering options upon clicking the icon:
// icon click handler shows popup
showMyPopup(e) {
    if (!this.MyPopup) this.MyPopup = this.ui(this.getMyPopupConfig());
    webix.delay(() => {
        this.MyPopup.show(webix.$$(e).$view);
    });
}
5.Finally, do not forget to override the default class with the new one.
webix.ui({
    view: "reports",
    url: "https://docs.webix.com/reports-backend/",
    override: new Map([
      [reports.views["modules"], CustomModules]
    ]),
});
Related sample: Report Manager: Filtering Report List
Changing the Toolbar Color

1. Create a custom class (CustomToolbar) by inheriting it from the default reports.views["toolbar"].
2. Inside the config method get the toolbar UI and apply custom css styles via the css field:
class CustomToolbar extends reports.views["toolbar"] {
    config() {
        let ui = super.config();
        ui.css = "webix_dark";
        return ui;
    }
}
3. Do not forget to override the default class with the new one.
webix.ui({
    view: "reports",
    url: "https://docs.webix.com/reports-backend/",
    override: new Map([
      [reports.views["toolbar"], CustomToolbar]
    ]),
});
Related sample: Report Manager: Dark Toolbar
Adding Richselect to the Toolbar
Create a custom class (CustomToolbar) by inheriting it from the default reports.views["toolbar"]. Inside the config method add a new element to the JSON configuration as the following:
class CustomToolbar extends reports.views["toolbar"] {
  config() {
    let ui = super.config();
    let elements = ui.elements;

    // adding richselect to the toolbar elements array
    elements.push({
      view: "richselect",
      value: "en",
      options: [{ id: "en", value: "en" }, { id: "ru", value: "ru" }],
      width: 65,
      on: {
        onChange: value => {
          webix.alert("'" + value + "' locale selected");
        },
      },
    });
    return ui;
  }
}
Do not forget to override the default class with the new one.
webix.ui({
    view: "reports",
    url: "https://docs.webix.com/reports-backend/",
    override: new Map([
      [reports.views["toolbar"], CustomToolbar]
    ]),
});
Related sample: Report Manager: Adding Richselect
Creating and Tuning a Single Report
Originally, Report Manager is aimed to work with multiple reports. But you can customize it to be able to create and work with a single report only.
Initial configuration of Report Manager
When initializing Report Manager:
1. Hide the list of reports by setting mode to "show".
2. Show report initially.
3. Hide the default toolbar.
webix.ui({
  view: "reports",
  id: "rpt",
  borderless: true,
  url: "https://docs.webix.com/reports-backend/",
  // id of the report to be displayed initially
  moduleId: 33,
  mode: "show",
  toolbar: false,
});
Defining logic for editing and saving
Start editing
To make this report editable access the state of the widget and set its mode property to "edit".
$$("rpt").getState().mode = "edit";
Saving updates
To save updated data, you need to:
1. Access to the Operations service and get the updated data via the getModuleSaveData() method.
2. Save the updated data back to the report via the updateModule() method.
    const rpt = $$("rpt");

    const state = rpt.getState();

    const mod = state.module;

    const operations = rpt.getService("operations");
    // get module properties to save
    const data = operations.getModuleSaveData(mod);
    // save module properties
    operations.updateModule(state.moduleId, {
            name: mod.name,
            text: JSON.stringify(data),
    });
Exit editing mode without saving
To cancel editing you need to return old report data from the local collection via the getModule() method. The method returns a promise so you need to wait for it and reset the report state.
  const rpt = $$("rpt");

    const state = rpt.getState();
    const local = rpt.getService("local");
    // reset module properties
    local.getModule(state.moduleId).then(mod => {
        state.module = JSON.parse(mod.text);
        state.saved = true;
        state.mode = "show";
    });
Related sample: Report Manager: Single Report
Back to top