How-tos
You can read about general customization rules in the corresponding article.
Adding Columns to the Users Grid
To add an extra column to the users grid, you need to change its JSON configuration:
class UserGrid extends userManager.views["users/grid"] {
  config() {
    const grid = super.config();

    const formatDate = webix.Date.dateToStr("%M %d, %Y %H:%i:%s");
    // adding "last visited" column
    const newColumn = {
      id: "visited",
      header: "Last seen",
      fillspace: 2,
      template(obj, type, value, column, index) {
        // parse ISO 8601 and apply formatting
        let date = new Date(value);
        return formatDate(date);
      },
    };

    grid.columns.push(newColumn);

    return grid;
  }
}
After that do not forget to override the default class:
webix.ui({
  view: "usermanager",
  url: "https://docs.webix.com/usermanager-backend/",
  override: new Map([
    [userManager.views["users/grid"], UserGrid]
  ])
});
Related sample: User Manager: Adding an Extra Column
Exporting Users to Excel

Create a new class (CustomToolbar) by inheriting it from the default userManager.views["users/toolbar"]. Inside its config method define a new button for exporting and add it to the toolbar:
class CustomToolbar extends userManager.views["users/toolbar"] {
    config() {
    const ui = super.config();
    const mainToolbar = ui.rows[0].cols;

    // configure new button
    const newButton = {
        view: "button",
        type: "icon",
        icon: "wxi-download",
        css: "webix_primary",
        label: "Export to Excel",
        autowidth: true,
        // custom method to export users
        click: () => this.ExportUsers(),
    };
    // add the button to the toolbar
    mainToolbar.splice(3, 0, newButton);
    return ui;
    }
}
Define the ExportUsers method and call the toExcel with the necessary export configuration:
// inside CustomToolbar
ExportUsers() {
    const local = this.app.getService("local");
    // get collection of users
    local.users().then(collection => {
        // excel config
        webix.toExcel(collection, {
            filename: "Users",
            columns: {
                name: { header: "Full name" },
                email: { header: "Email" },
                visited: {
                    header: "Last seen",
                    // custom function for date format
                    format: value => formatDate(new Date(value)),
                },
                status: {
                    header: "Status",
                    format: value => (value ? "Active" : "Not active"),
                },
            },
        });
    });
}
Do not forget to override the default class with the new one:
webix.ui({
  view: "usermanager",
  url: "https://docs.webix.com/usermanager-backend/",
  override: new Map([
        [userManager.views["users/toolbar"], CustomToolbar]
    ])
});
Related sample: User Manager: Export Users to Excel
Adding New Fields to User Details and Editor
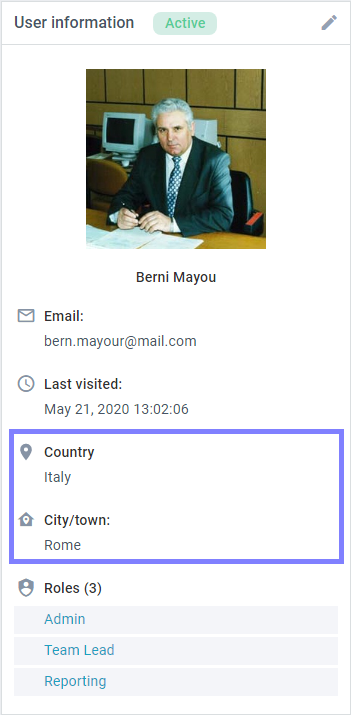
1. Create a new class (UserDetails) by inheriting it from the default userManager.views["users/details"]. Inside its GetDetailsHTML method add the necessary fields to the user details as it is shown below:
class UserDetails extends userManager.views["users/details"] {
  GetDetailsHTML(user, roles, rules) {
    let userDetails = "";

    // ...other fields

    // the new 'Country' field with svg icon
    userDetails +=
      "<div class='webix_um_infolist_header'>" +
      "<span class='webix_icon'>" +
      // custom svg icon
      mapIconSvg +
      "</span> Country</div>" +
      "<div class='webix_um_infolist_details'>" +
      (user.country || "Unknown") +
      "</div>";

    // the new 'City' field with Material Design icon
    userDetails += this.InfoTemplate(
      user.city,
      "City/town",
      // material design icon
      "mdi mdi-home-map-marker"
    );

    userDetails += this.GetListsHTML(user, roles, rules);

    return userDetails;
  }
}
2. Next step is to implement an ability to set and edit the new fields. Create a custom class (UserForm) by inheriting it from the default userManager.views["users/form"]. Inside its config method add the fields to the form interface as in the example below:
class UserForm extends userManager.views["users/form"] {
  config() {
    const ui = super.config();

    // use "cols" layout to limit the field width
    const inputs = [
      {
        cols: [
          {
            view: "text",
            placeholder: "Type a country...",
            label: "Country",
            name: "country",
            suggest: {
              body: {
                // predefined array of countries
                data: countries,
              },
            },
            // ...
          },
          {},
        ],
      },
      {
        cols: [
          {
            view: "text",
            label: "City/town",
            name: "city",
            suggest: {
              body: {
                // predefined array of cities
                data: cities,
              },
            },
            // ...
          },
          {},
        ],
      },
    ];
    /* the form contains two rows layouts:
    ( 1 - buttons, 2 - scrollable "rows" layout).
     So put the new fields into the second layout */
    let rows = ui.rows[1].rows;
    rows.splice(rows.length - 3, 0, ...inputs);
    return ui;
  }
}
Do not forget to override the default classes with new ones:
webix.ui({
  view: "usermanager",
  url: "https://docs.webix.com/usermanager-backend/",
  override: new Map([
        [userManager.views["users/details"], UserDetails],
        [userManager.views["users/form"], UserForm],
    ])
});
Related sample: User Manager: Adding Fields to User Details
Back to top