User Manager User Guide
Webix User Manager is a modern tool for managing and monitoring user access rights. Here you can look through the information about registered users, assign rules to them directly or group rules into roles. The widget provides an audit system, where you can view the activity log and get additional information about changes in user access rights. Read further to dive into the app interface and main controls.
Main Screens
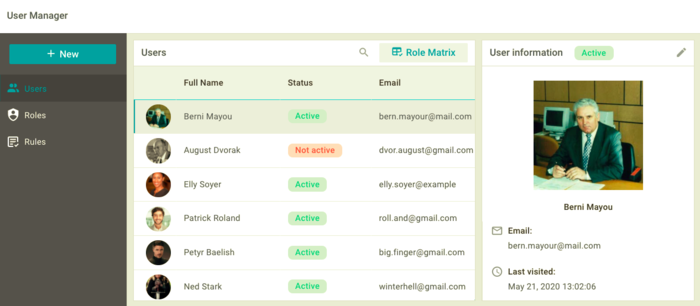
Visually User Manager consists of 4 parts:
- Top panel
- Left panel
- Data tables
- Information panel.
Top panel
You can find Top panel on the very top of User Manager. On the left part of the panel there is a label with the widget name. On the right part there is a data save indicator which is activated when the information is saved.
Left panel
Left panel is used for navigation and switching between data tables with information about users, roles and rules. Here you can also create users and roles by clicking on the "+ Add" button on the top of the panel.
Left panel includes the following controls:
- "+ Add" button
- Navigation menu with the following options:
- Users
- Roles
- Rules.
Data tables
The Data tables panel is the core of User Manager. Depending on the selected option in the Left panel menu, you can look through the tables with the information about users, roles and rules, as well as manage them using "Role Matrix" and "Rule Matrix". There are 3 data tables:
- User table
- Role table
- Rule table.
The data tables have a similar structure and consist of a Toolbar on the very top and a Data table below it.
On the left part of the Toolbar there is a panel name.
On the right part there is a "Search" icon.
Depending on the data type, there can be a matrix mode button to the right.
It is used to switch between the preview mode and matrix mode.
You can sort and search the data in the table as well as show Information panel by clicking on any record.
To sort the records, click on the header of the desired column. The system will sort the items in ascending or descending order.
To search the records, click on the Search icon on the right part of the Toolbar and enter the needed data.
Information panel
Information panel is designed for previewing, editing and deleting information about the main elements of User Manager. You can open the panel on the right part of the widget by clicking on any element in the Data tables panel.
Users
Here you will learn how to manage user access rights, create, edit and delete information about users.
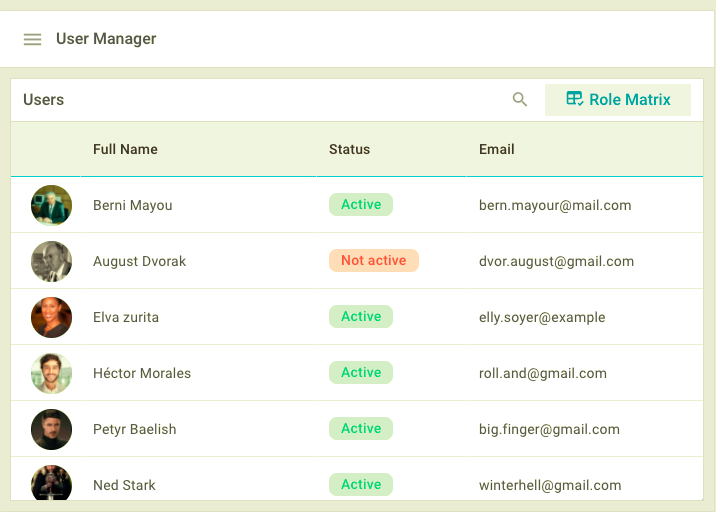
User table
User table consists of 4 columns:
- User picture
- User name
- Status (Active/Not active)
- Email.

Click on any record of the User table to open the *User information". Here you can get detailed information about the user, edit or delete its data.
Role Matrix
To go to the matrix mode of User table, click on the "Role Matrix" button on the right part of Toolbar. The first column of the matrix contains user names. Headers of other columns display role names.
You can check and uncheck cells at the intersection of users and roles to assign roles to the required users or unassign them. The changes will be saved instantly.
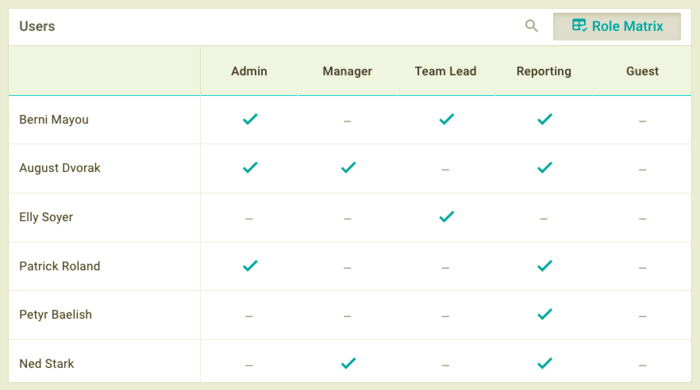
To go back to the preview mode of User table, click on the "Role Matrix" button again.
User information
The User information panel is designed for previewing, editing and deleting information about the user. There are 2 display modes:
- Preview Mode
- Edit Mode.
Preview Mode
To open the User information panel in the preview mode, click on any element of User table or create a new user. On the very top of the panel you can see the panel name, user status and the "Pencil" icon that allows to go to the edit mode. Here you can see the following elements:
- User picture
- User name
- Last visit date
- List of roles assigned to the user
- List of rules assigned to the user.
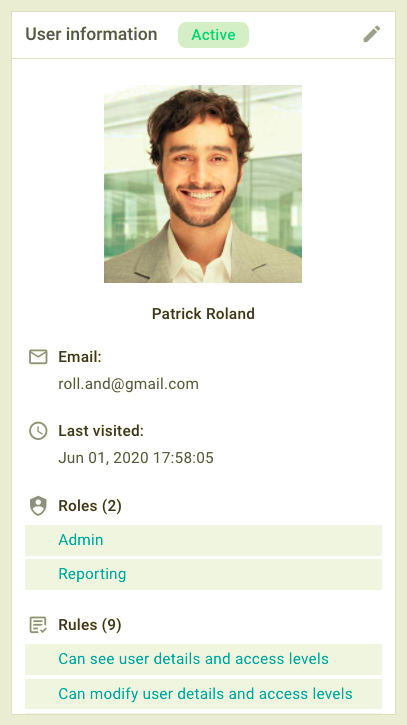
Click on any element of List of roles or List of rules in the preview mode to open the corresponding table and study the detailed information about the item.
Edit Mode
To switch to the edit mode, click on the "Pencil" icon in the right top corner of the panel. This action will open a panel with tabs where you can view and edit information about the user. The panel includes the following tabs:
- General
- Rules
- Roles
- Audit.
General Tab
In the General tab you can look through and edit general information about the user. It includes a form with the following fields:
- User name
- User picture
- Status (Active/Not active)
- Credentials
- Details.
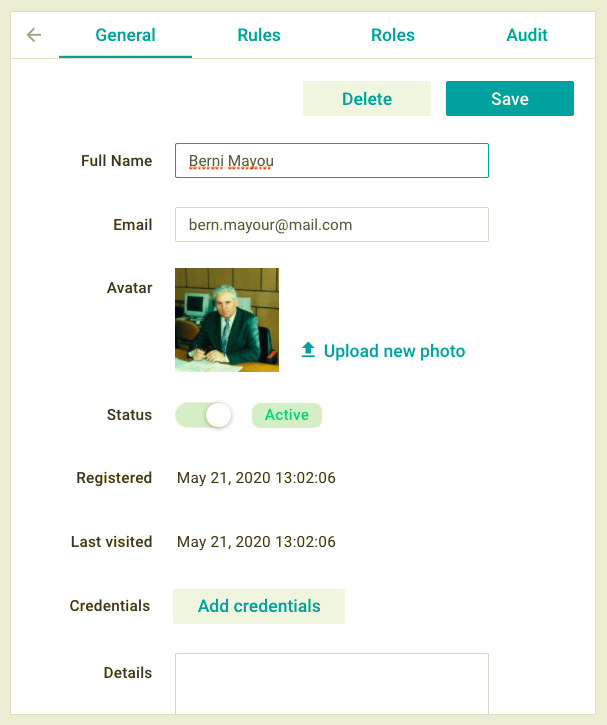
After the user data is changed, click on the "Save" button in the top right corner to save the information.
To delete the user information, click on the "Delete" button in the top right corner near the "Save" button and confirm the action.
To change the credential data you should take the following steps:
1) Go to the Credentials option and click on the "Add credentials" button

The widget will display 2 buttons opposite the option:
- Reset password
- Delete credentials.

2) Click on the "Reset password" button to show the pop-up form with the following controls:
- Generate password
- Input field
- Reset password.
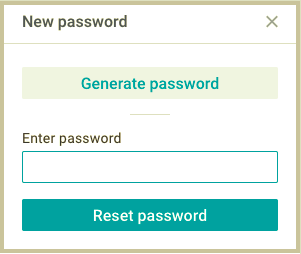
To generate a random password, click on the "Generate password" button. To create a custom password, enter it in the input field and click on the "Reset password" button. Either of the actions will set a new password and close the pop-up form.
To delete the credential data click on the "Delete credentials" button and confirm the action.
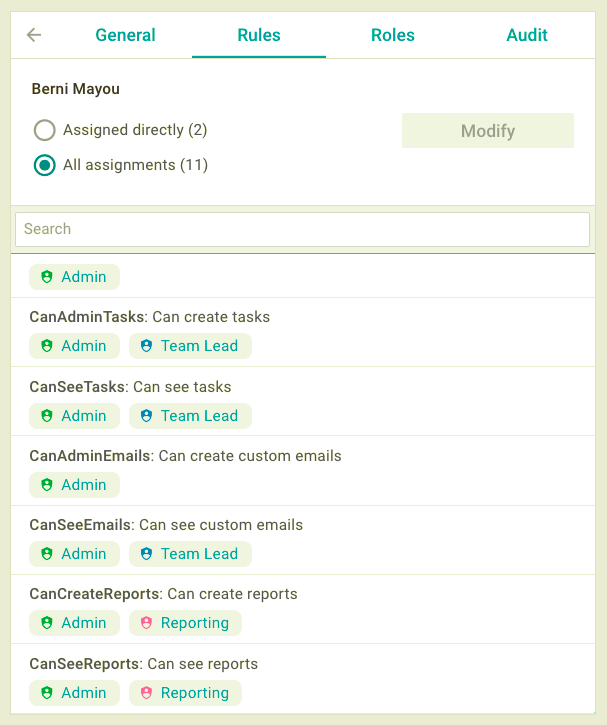
Rule Tab
In the Rules tab you can look through the list of all rules assigned to the user, including those assigned directly and via the role, and edit the list of rules assigned to the user directly. It includes the following elements:
- User name
- Radio buttons:
- "Assigned directly" (quantity of rules)
- "All assignments" (quantity of rules)
- Search field
- List of rules.
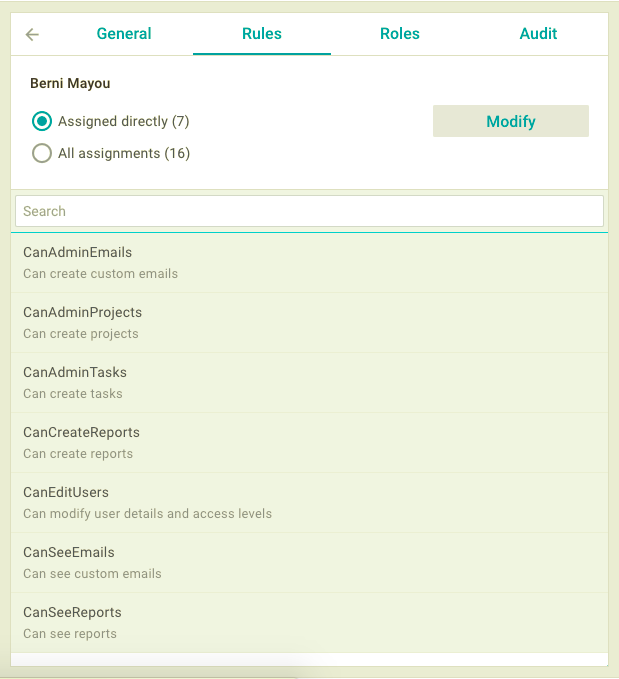
When you switch between radio options, the widget displays the corresponding list of rules at the bottom of the panel.
To edit the list of rules assigned to the user directly you should:
1) Click on the "Assigned directly" option
2) Click on the "Modify" button opposite the controls
3) Select the required roles from the list at the bottom of the panel
4) Click on the "Done" button opposite the controls, to go back to the preview mode of the tab.
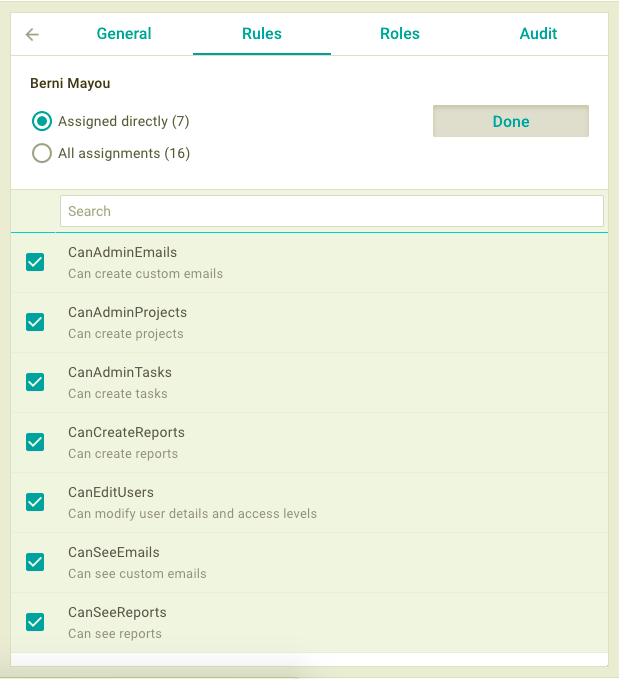
The list of all assigned rules is available only for preview.
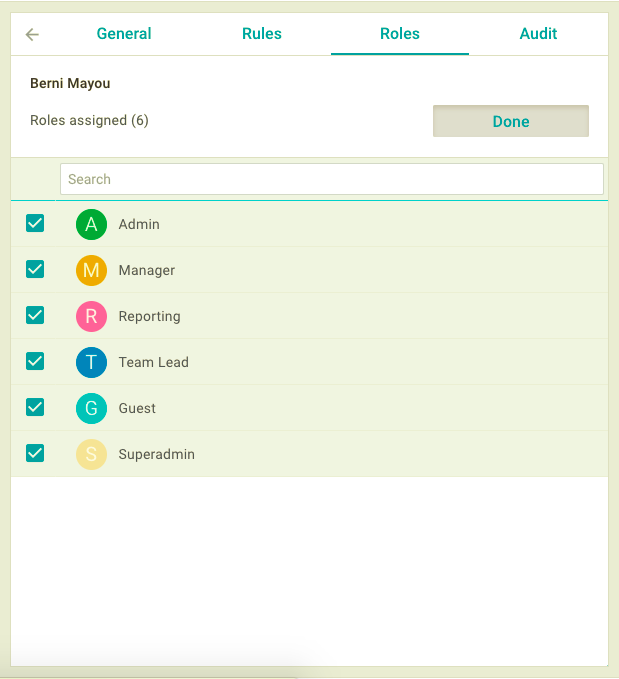
Roles Tab
In the Roles tab you can look through and edit the list of roles assigned to the user. It includes the following elements:
- User name
- "Roles assigned"(quantity of roles)
- Search field
- List of roles.
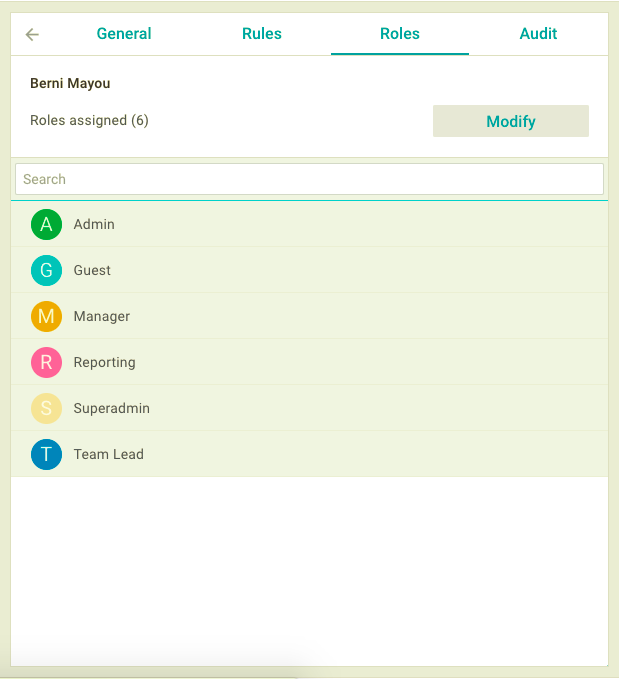
To edit the list of roles assigned to the user you should:
1) Click on the "Modify" button opposite the "Roles assigned" label
2) Select the required elements from the role list at the bottom of the panel
3) Click on the "Done" button to go back to the preview mode of the tab.
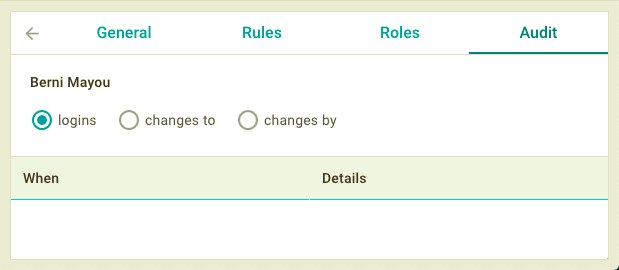
Audit Tab
In the Audit tab you can look through the activity log and get additional information about changes in user access rights. It includes the following elements:
- User name
- Radio buttons:
- logins
- changes to
- changes by
- Table with logs.
Click on the logins option to display the following data in the log table:
- When (date of operation)
- Details (who performed the operation).
Click on the changes to option to display the following data in the log table:
- When (date of operation)
- Who (who performed the operation)
- Operation (name of operation)
- Details (details of operation).
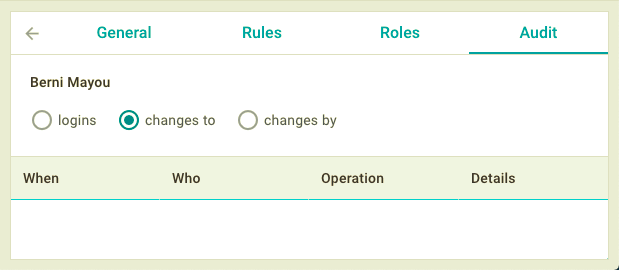
Click on the changes by control to display the following data in the log table:
- When (date of operation)
- Target (who/what was modified)
- Operation (name of operation)
- Details (details of operation).

To go back to the preview mode of the panel, click on the "Arrow" icon in the left top corner of the panel.
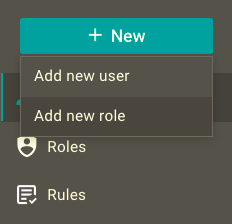
Creating users
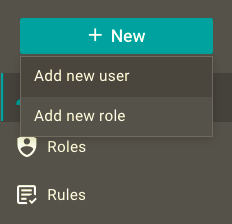
To create a new user you should take the following steps:
1) Go to Left panel and click on the "+ New" button to open the menu with options
2) Select the Add new user option to show the pop-up window with the input field
3) Enter user name in the appeared input field and click on the Save button to add a new user to User table.
Roles
Here you will learn how to combine rules into roles, create, edit and delete information about roles.
Role table
Role table consists of 2 columns:
- Role picture
- Role name.
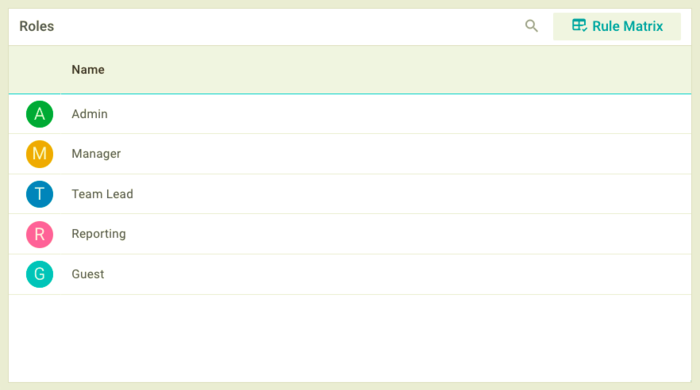
Click on any record of the Role table to open the Role information panel with an ability to look through, edit and delete the role data.
Rule Matrix
To go to the matrix mode of Role table, click on the "Rule Matrix" button on the right part of Toolbar. The first column of the matrix contains rule names with descriptions. Headers of other columns include role names. You can check or uncheck cells at the intersection of rules and roles to assign rules to the required roles or unassign them. The changes will be saved instantly.
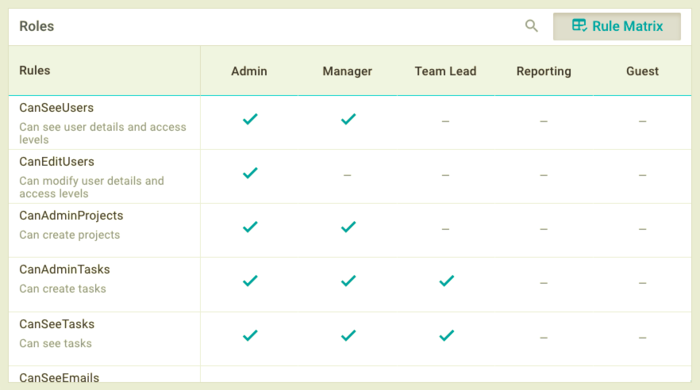
To go back to the preview mode of Role table, click on the "Rule Matrix" button again.
Role information
The Role information panel is designed for previewing, editing and deleting information about the role. There are 2 display modes:
- Preview Mode
- Edit Mode.
Preview Mode
To open the Role information panel in the preview mode click on any record of Role table. On the very top of the panel you can see the panel name and the "Pencil" icon that allows to go to the edit mode. Here you can see the following elements:
- Role picture
- Role name
- List of rules assigned to the role
- List of users assigned to the role.
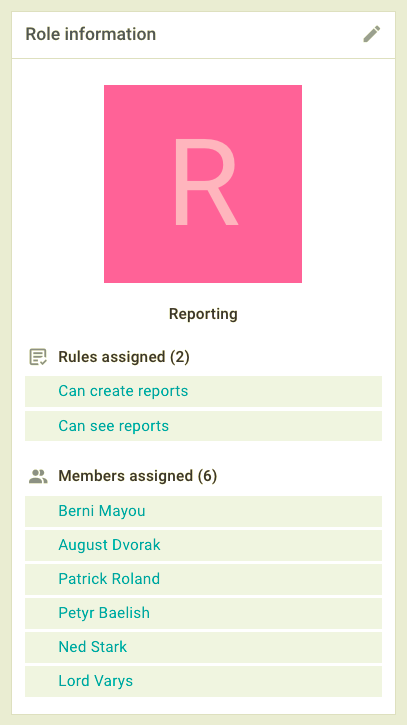
Click on any element of List of rules or List of users in the preview mode to open the corresponding table and study the detailed information about the item.
Edit Mode
To switch to the edit mode click on the "Pencil" icon in the right top corner of the panel. This action will open a panel with tabs where you can view and edit information about the role. The panel includes the following tabs:
- General
- Rules
- Members.
General Tab
In the General tab you can look through and edit general information about the role. It includes a form with the following fields:
- Role name
- Color picker.

After the role data is changed, click on the "Save" button in the top right corner to save the information.
To delete the role click on the "Delete" button in the top right corner near the "Save" button.
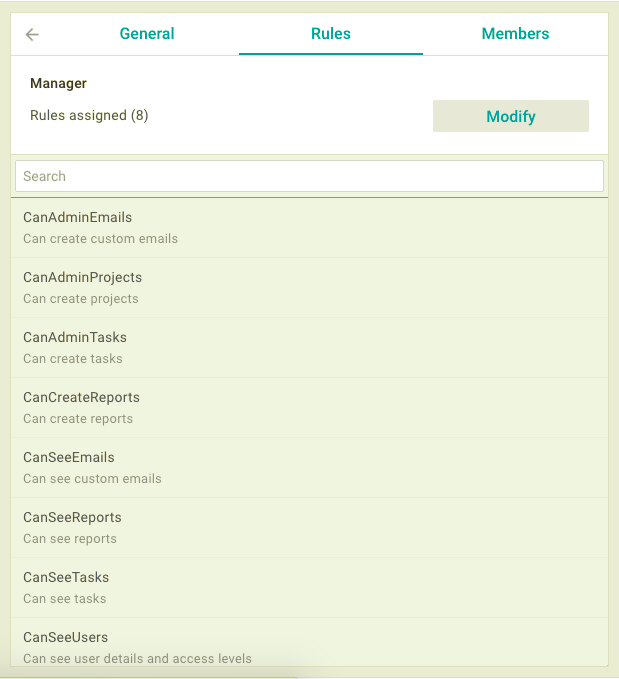
Rules Tab
In the Rules tab you can look through and edit the list of rules assigned to the role. It includes the following elements:
- Role name
- "Rules assigned" (quantity of rules)
- Search field
- List of rules.
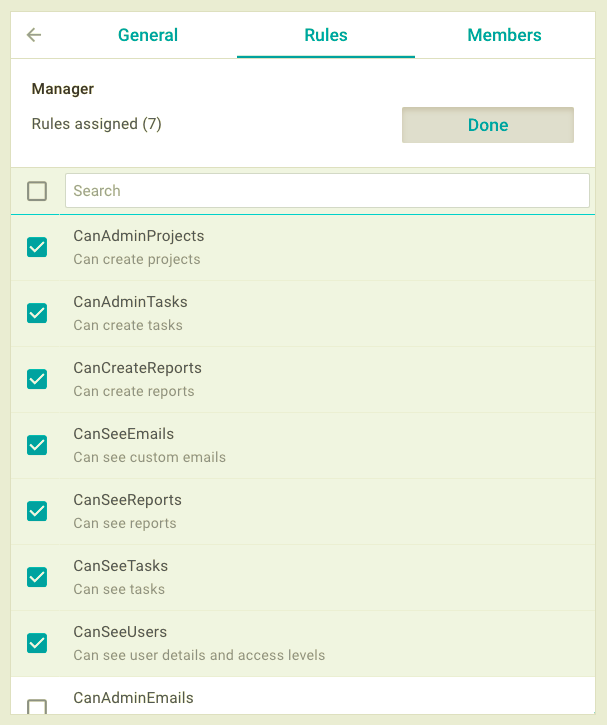
To edit the list of rules assigned to the role you should:
1) Click on the "Modify" button opposite the "Rules assigned" label
2) Select the required rule from the list at the bottom of the panel
3) Click on the "Done" button to go back to the preview mode of the tab.
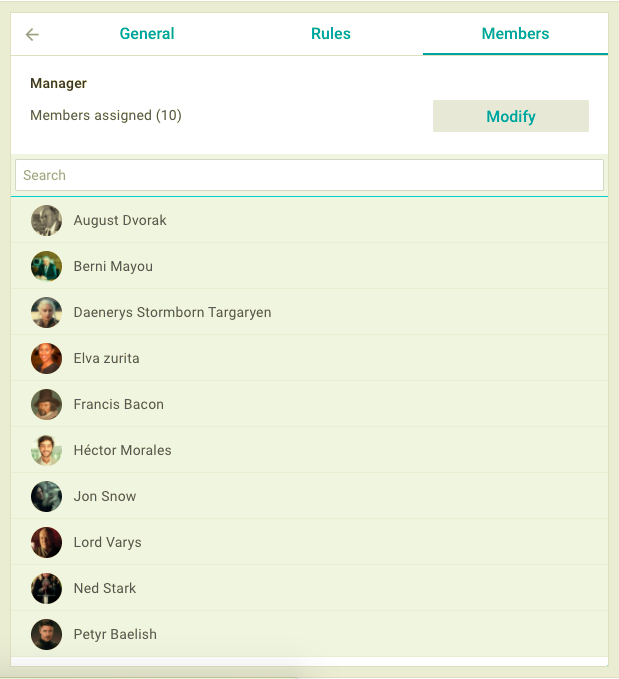
Members Tab
In the Members tab you can look through and edit the list of users assigned to the role. It includes the following elements:
- Role name
- "Members assigned" (quantity of users)
- Search field
- List of users.
To edit the list of members assigned to the role you should:
1) Click on the "Modify" button opposite the "Members assigned" label
2) Select the required users from the list at the bottom of the panel
3) Click on the "Done" button to go back to the preview mode of the tab.

To go back to the preview mode of the panel, click on the "Arrow" icon in the left top corner of the panel.
Creating roles
To create a new role you should take the following steps:
1) Go to the Left panel and click on the "+ New" button to open the menu with options
2) Select the Add new role option to show the pop-up window with the input field
3) Enter the role name in the input field and click on the "Save" button to add the new role to Role table and show the Role information panel.
Rules
The rules are set by the server administrator and can't be changed by users.
You can combine rules into roles using "Rule Matrix" or editing the role, and assign the rules to the users directly or via the roles using "Role Matrix" or editing user.
Rule table
Rule table consists of 2 columns:
- Rule name
- Rule description.
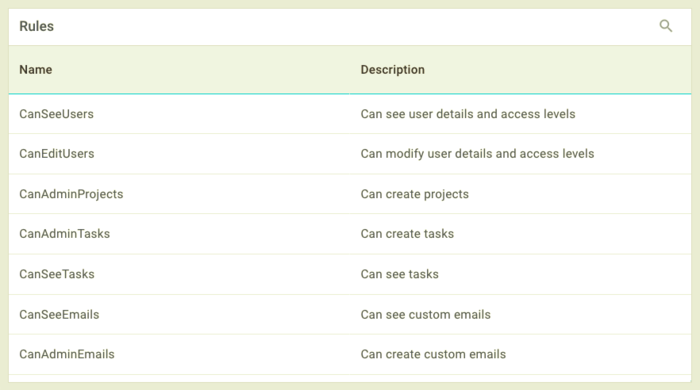
Click on any record of Rule table to look through the information about the rule.
Rule information
The Rule information panel is designed for previewing information about rules.
You can show it by clicking on any rule of Rule table.
Here you can look through the following data:
- Rule name
- Rule description
- List of roles related to the rule
- List of users related to the rule.
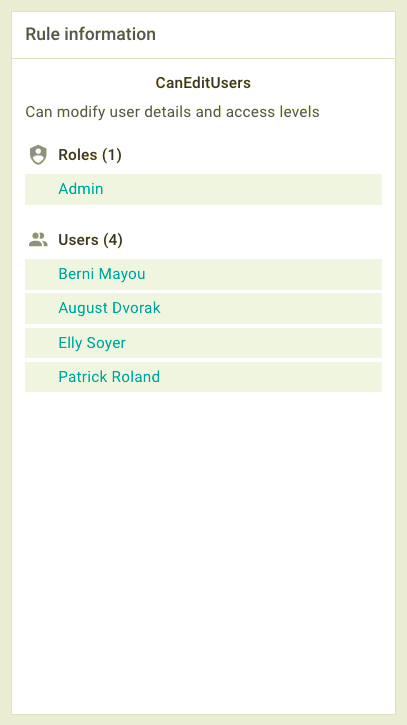
Click on any element of List of roles or List of users to open the corresponding table and study the detailed information about the item.
Compact Mode
The interface is designed in such a way that the usability of the widget doesn't depend on the gadget you work with. User Manager preserves its functionality even on your mobile devices. In this case, you can show and hide Left panel with the main controls by clicking on the "Menu" button on the left part of the Top panel.