Styling DataTree
You can use CSS in conjunction with Tree nodes to achieve the desired look-and-feel.
In this article, you will know how:
- to fine-tune the style of a whole tree or specific nodes;
- to add tree lines;
- apply templates;
- customize icons.
Styling a Whole Tree
To apply some style to the whole tree, you can use the css parameter.

<style> .my_style {
font-style: italic;
color:blue;
}
</style>
<script> webix.ui({
view:"tree",
css:"my_style",
...
});
</script>
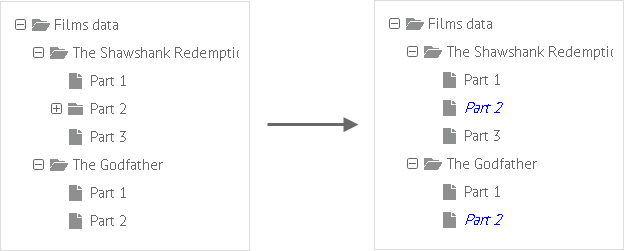
Styling Specific Nodes
Generally, to style a specific item, you can add the $css attribute inside the data source.
<style> .my_style{
background-color:#FFAAAA;
}
</style>
<script>webix.ui({
view:"tree",
data: [
{id:"root", value:"Films data", open:true, data:[
{ id:"1", open:true, value:"The Shawshank Redemption", data:[
{ id:"1.1", value:"Part 1" },
{ id:"1.2", value:"Part 2", $css:"my_style" },
{ id:"1.3", value:"Part 3" }
]},
{ id:"2", value:"The Godfather", open:true, data:[
{ id:"2.1", value:"Part 1" },
{ id:"2.2", value:"Part 2", $css:"my_style" }
]}
]}
]
});
</script>
Adding Lines
To add lines to tree nodes, set the type parameter to the 'lineTree' value.
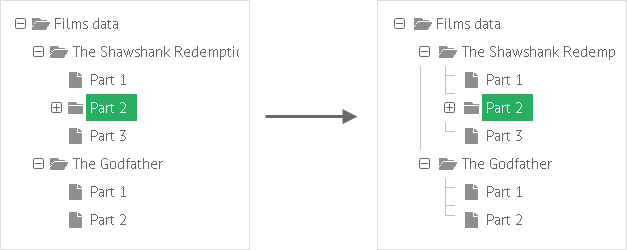
Adding lines to tree nodes
webix.ui({
    view:"tree",
    type:"lineTree"
});
Note, you still have a possibility to define your custom style for lines and apply it through the css parameter (see details in the first part).
Templates
One of the ways to fine-tune the style of the tree is defining some template for it.
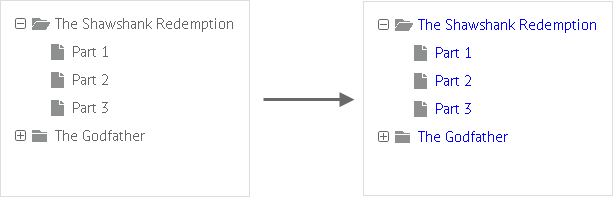
Using templates for styling
webix.ui({
    view:"tree",
    template:"{common.icon()}{common.folder()}<div style='color:blue;'>#value#</div>"
});
Read more about using templates in Node Templates.
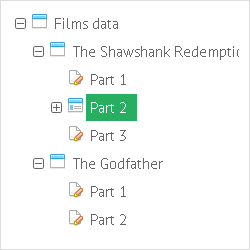
Custom Folder and Files Icons
The look-and-feel of tree icons is set via CSS classes applied to definite parts of it. You can:
- redefine existing Webix CSS classes. It changes icons for all tree nodes;
- set custom images as icons to desired tree nodes. For these needs, icons are stored in the dataset and applied via
- custom CSS classes;
- node templates.
- modify tree type to add extra helpers that will render the needed node elements (including Font Awesome Icons).
Redefining existing Webix CSS classes
Study the Tree CSS image map to learn which CSS classes there are in Tree. Folders and files have the following CSS:
- webix_tree_folder - closed folders;
- webix_tree_folder_open - open folders;
- webix_tree_file - files (elements with no children).
The simplest way to change folder and file icons for all tree nodes is to redefine default ones:
/* customizing all folders and files in a tree */
.webix_tree_folder{
    background-image: url("icons/folder.png");
    background-position: 0px 4px;
}
.webix_tree_file{
    background-image: url("icons/file.png");
    background-position: 0px 4px;
}
Related sample: Custom Folders
Using Custom Images as Icons
To set icons to desired tree nodes, you should store their titles in the data source:
If icon titles are stored under an icon property in the dataset, they are applied as webix_icon_{icon_name} CSS class:
var data_with_icon = [
    { id:"root", value:"Films data", icon:"home", open:true, data:[
        { id:"1", icon:"puzzle", value:"Part 1" }]
    }
];
webix.ui({
    view:"tree",
    data:data_with_icon
});
The root item gets webix_icon_home CSS class. All you have to do is to set the rule for this class:
.webix_tree_home{
    background-image: url("icons/home.png")
}
If icon titles are stored under the image property in the dataset, they are applied within a node template:
var data_with_icon = [
    { id:"root", value:"Films data", image:"home", open:true, data:[
        { id:"1.1", image:"puzzle", value:"Part 1" }]
    }
];

webix.ui({
    view:"tree",
    template:"<img src='icons/#image#.png' style='...'> #value#",
    data:data_with_icon
});
You can study Webix tree node templates in detail separately.
Back to top