Tree Nodes Manipulations
Adding Nodes
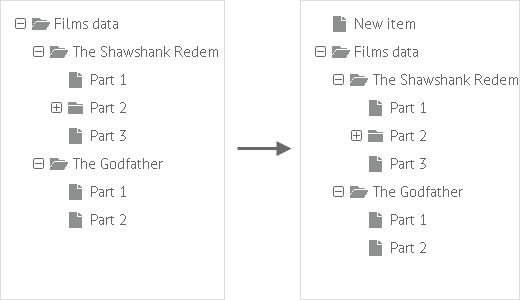
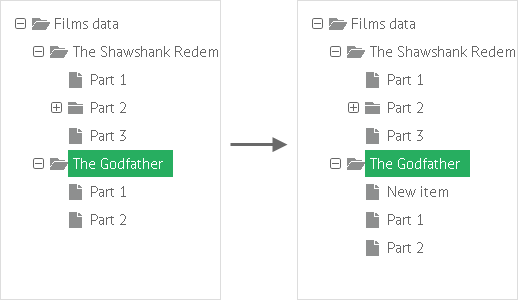
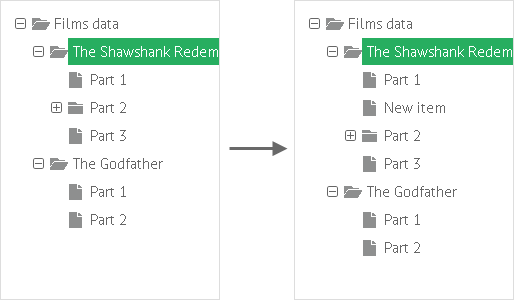
Generally, to add a node (parent or child) you should use the add method. The position of the new element depends on the parameters you pass to the method.
If you need to add several nodes into the Tree, it's better to use the parse method
The add method accepts 3 parameters:
- obj - the item object
- pos - the position that the new item should have after being inserted into the tree (counting from 0).
Note that:- 0 - the item will be added as the first child (start position)
- -1 - the item will be added as the last child (end position)
- parent - (optional) the parent node id. If it's not specified, the item will be added to the root of the tree.
Note that you can use the getBranchIndex method to get the position of a node by its ID (read more).
| Nesting level | Example |
|---|---|
| Root node |
|
| Child node (first child) |
|
| Child node (second child) |
|
Deleting Nodes
To delete a node (parent or child), use the remove method and specify the id of the node there:
Deleting the currently selected node
var tree = webix.ui({ view:"tree",... });

var nodeId = tree.getSelectedId();
tree.remove(nodeId);
Selecting Nodes
To select a specific node you should call the select method:
Selecting a node
var tree = webix.ui({ view:"tree",... });

tree.select("node2"); // 'node2' is the item id
For more details, read Items Selection.
Expanding/Collapsing Branches
Tree nodes are collapsed and expanded:
- by clicking on a "+/-" icon or a node (default behavior);
- by clicking on a node text provided that activeTitle property is defined for the tree.
view:"tree",
activeTitle:true, //false by default
data:[...]
Related sample: Tree: JSON Dataset
Tree provides several methods to manage 'open'/'close' state of a node. They are:
| Method | Description |
|---|---|
| open | opens the branch with the specified id |
| close | closes the branch with the specified id |
| openAll | opens all branches in the tree |
| closeAll | closes all branches in the tree |
| isBranchOpen | checks whether the specified branch is opened |
| getOpenItems | returns ids of the opened branches |
Checking whether the currently selected branch is opened
var tree = webix.ui({ view:"tree",... });

var nodeId = tree.getSelectedId();
tree.isBranchOpen(nodeId);
Filtering Nodes
To filter the tree nodes you should call the filter method:
Filtering the tree
var tree = webix.ui({ view:'tree', ...});

tree.filter("#value#", "abc"); //leaves in the tree just items that contain text 'abc'
Read more in Filtering in Tree.
Sorting Nodes
To filter the tree nodes you should call the sort method:
Ascending sort in the tree
var tree = webix.ui({ view:'tree', ...});

tree.sort("#value#", "asc"); //sorts all nodes (parent, child)
Read more in Sorting in Tree.
Updating the Tree
To update the tree, you can call either of these methods:
Methods lead to one and the same result and don't have any specificity.
tree.refresh();
//or
tree.updateItem(node_id, nodeObj);