Advanced
Defining Drag Marker
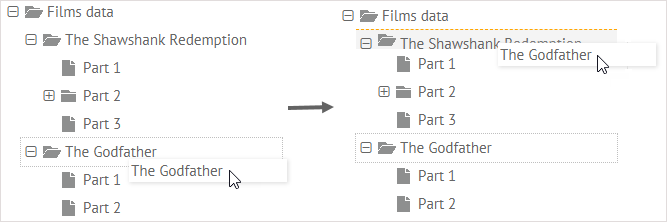
Drag Marker is a graphical element that appears in the dropping area and helps see the position where the dragged element needs to be dropped.
Related sample: Custom Target Drag Marker
The look-and-feel of the drag marker is set via a div element with a CSS class where you set all its properties (positioning, borders, background color, marker text (if any), etc.. ).
.my_line_mark{
    border-top:1px dashed orange;
    width:100%; height:1px;
    position:absolute;
    left:0px;
    display:none;
}
The div element is placed into the document body:
var marker = webix.html.create("div", {
"class":"my_line_mark"
}," ");
document.body.appendChild(marker);
The library features a set of methods for working with HTML. One of them, create, makes an HTML div container with JavaScript means and assigns a CSS to it, while the content of the new HTML block is empty, which is signified by  .
After that, you should extend the already initialized component with the drag marker functionality. Here the $dragMark property comes to your help. Its value is a function that makes the marker visible as soon as the dragged element reaches the target area. Marker dimensions depend on the dimensions of the dragged element:
webix.extend(treea, {
 $dragMark:function(context, ev){
   marker.style.display = 'none';
    if (context.target){
     // the position of the target view
     var pos = webix.html.offset(ev.target);

     // the current position of the dragged element
     var box = webix.html.offset(this.$view);

     // shows the marker
     marker.style.display = 'block';
     // sets the top offset of the marker
     marker.style.top = pos.y+"px";
     // sets the left offset of the marker
     marker.style.left = box.x+"px";
     // sets the marker width
     marker.style.width = this.$view.offsetWidth+"px";
   }
  }
}, true);
Comments:
- the function takes drag-n-drop context (described above) and native DOM event as parameters;
- initially the drag mark is not displayed and becomes visible only in the target area;
- firstly, the properties of a dragged element are found out; then they define the properties of the drag marker;
- the webix.html.offset method gets the absolute top and left positioning of an HTML element specified as an argument;
- the offsetWidth DOM property returns the width of an element, including borders and padding.
Adding and Removing Marks
The addCss and removeCss methods can help you apply any style for your drag marker defined as a CSS class. They are also used within the $dragMark function, but here you don't need to create a separate HTML container for the marker.
webix.extend(treeb, {
    $dragMark:function(context, ev){
        if (this.my_marked && this.my_marked != context.target){
            this.removeCss(this.my_marked, "my_custom_mark", true);
            this.my_marked = null;
        }
        if (context.target){
            this.my_marked = context.target;
            this.addCss(context.target, "my_custom_mark", true);
        }
    }
}, true);
- my_custom_mark is a CSS class for the drag marker;
- a marker is added only to a target component (the mark becomes visible as you drag an item to the target);
- a marker is hidden the moment a dragged item leaves the target area as well as the moment you drop an item there.
Related Articles
- Defining Drag Area
- Drag-n-drop with Tree and TreeTable Components
- Drag-n-drop Between Different Component