How-tos
You can read about general customization rules in the corresponding article.
Adding Columns to the Project Tree
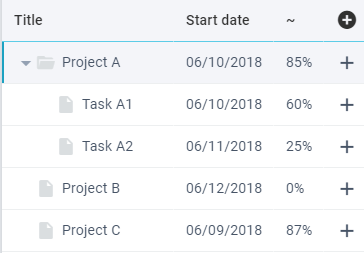
To add a custom column(s), create a new class by inheriting it from the default gantt.views.tree. Inside the config method split the default UI and add configuration for the new column:
class CustomTree extends gantt.views.tree {
    config() {
        const compact = this.getParam('compact', true);
        const ui = super.config();

        // adding new column for progress
        ui.columns.splice(compact ? 3 : 2, 0, {
            id: 'progress',
            header: '~',
            template: "#progress#%", // progress field comes from dataset
            width: 40,
        });

        return ui;
    }
}
Then, override the default class via the corresponding property:
webix.ui({
    view: "gantt",
    override: new Map([[gantt.views.tree, CustomTree]]),
});
Related sample: Gantt: Extra Column
Adding Custom Tooltip for a Task

To add a custom tooltip for tasks, create a new class by inheriting it from the default gantt.views["chart/bars"]. Inside it, call the GetTooltip() method and return a new tooltip with the desired data template to display:
class CustomBarsView extends gantt.views["chart/bars"] {
    GetTooltip(obj) {
        if (obj.type == "milestone") return `You've reached ${obj.text}`;
            const type = obj.type.charAt(0).toUpperCase() + obj.type.slice(1);
            const days = obj.duration > 1 ? "days" : "day";
            const title = obj.text ? obj.text : "(no title)";
            return `${type}: ${title}<br>
                Scheduled for ${obj.duration} ${days}<br>
                ${obj.details ?? ""}`;
    }
}
Then, override the default class via the corresponding property:
webix.ui({
    view: "gantt",
    override: new Map([[gantt.views["chart/bars"], CustomBarsView]]),
});
Related sample: Gantt: Custom Tooltip
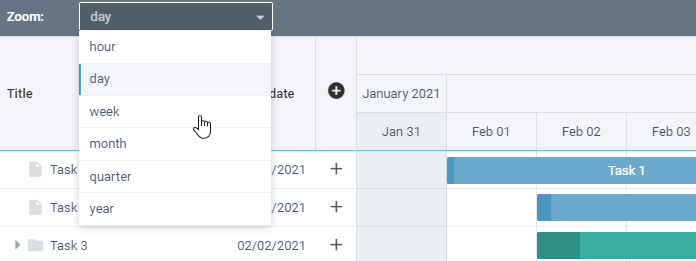
Implementing Scales Zoom
In implement zooming functionality for scales, you should provide configuration for the new scale and refresh Gantt widget.
First, define a function that will reset scales according to the mode set:
function resetScales(v, o) {
  const current = gantt1.getService("local").getScales();
  if (!(originalEndDate || originalStartDate)) {
    originalStartDate = webix.Date.add(current.start, 1, o, true);
    originalEndDate = webix.Date.add(current.end, -1, o, true);
  }

  const cellWidth = cellWidths[v];
  const scales = getScales(v);

  const start = webix.Date.add(originalStartDate, -1, v, true);
  const end = webix.Date.add(originalEndDate, 1, v, true);

  gantt1
    .getService("local")
    .setScales(
      start,
      end,
      !(v == "day"),
      cellWidth,
      current.cellHeight,
      scales
    );
}

// returns new scales that will be rendered
function getScales(minScale) {
  const scales = [];
  switch (minScale) {
    case "year":
      scales.push(yearScale);
      break;
    case "quarter":
      scales.push(yearScale, quarterScale);
      break;
    // other cases
  }
  return scales;
}
To be able to actually zoom the chart, define a richselect with options for zooming. When the control value changes, the resetScales function is called:
const zoom = {
  view: "richselect",
  label: "Zoom:",
  value: "month",
  width: 300,
  options: ["hour", "day", "week", "month", "quarter", "year"],
  on: {
    onChange: resetScales,
  },
};
Then add a toolbar and place the richselect inside the elements field:
webix.ui({
  rows: [
    {
      view: "toolbar",
      id: "toolbar",
      css: "webix_dark",
      paddingX: 10,
      elements: [zoom, {}],
    },
    {
      view: "gantt",
      id: "gantt1",
      url: "https://docs.webix.com/gantt-backend/",
      // other properties
    },
  ],
});
Related sample: Gantt: Scale Zoom
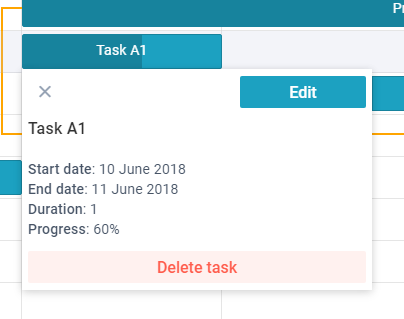
Info Popup and Wide Form
This example shows how to get rid of the right panel and:
- display a small information popup instead of the right panel
- open a big form for editing in place of the Tasks area
The changes concern desktop mode only, the compact view remains unchanged.
Preparing Popup
Task Info view will be placed into a popup, so we need to make several adjustments beforehand:
- set paddings and sizes of UI elements
- hide some details (e.g. successors, predecessors...) from template to keep it small
- change the "Edit" button action, so that it can open the form in place of the chart
class CustomInfo extends gantt.views["task/info"] {
   // styling
  config() {
    this.Compact = this.getParam("compact", true);
    const ui = super.config();
    if (!this.Compact) {
      ui.body.rows[0].padding = 4; //toolbar
      ui.body.rows[1].padding = 4; //main area
      ui.body.rows[1].rows[0].autoheight = true; //template
      ui.body.rows[1].rows[1].inputWidth = 0; //button
    }
    return ui;
  }
  // "Edit" button action
  EditTask() {
    if (!this.Compact) {
      this.getParentView().Hide();
      this.app.show("top/task.form");
    } else super.EditTask();
  }
 // less details
  InfoTemplate(obj) {
    obj.targets = obj.sources = [];
    delete obj.details;
    return super.InfoTemplate(obj);
  }
}
After that create the InfoPopup class with a Popup component that contains the above CustomInfo view. Also, define methods to show/hide the popup:
class InfoPopup extends gantt.views.JetView {
  config() {
    return {
      view: "popup",  width: 350,
      body: CustomInfo,
    };
  }
  Show(node) {
    this.getRoot().show(node);
  }
  Hide() {
    this.getRoot().hide();
  }
}
Showing and Hiding Info Popup
The next step is to show and hide the Info Popup upon clicking the tasks. It can be implemented by redefining the default gantt.views["chart/bars"] class:
class CustomBarsView extends gantt.views["chart/bars"] {
  config() {
    const ui = super.config();
    // show InfoPopup on clicking the task
    ui.cells[1].on.onItemClick = (id, e, node) => {
      this.State.$batch({
        parent: null, selected: id,
      });
      this.Info.Show(node);
    };
    return ui;
  }
  init(view) {
    super.init(view);
    // create a popup window
    this.Info = this.ui(InfoPopup);
    // handle hide event
    this.on(this.app, "edit:stop", () => {
      this.State.selected = this.State.parent = null;
      this.Info.Hide();
    });
  }
}
Preparing Form View
If needed, you can split Form UI into columns and show the Notes field on the right side. Also, as the form now overlaps Tasks area, on-change editing can be removed.
class CustomForm extends scheduler.views["event/form"] {
    config() {
      let ui = super.config();
      if (!this.Compact) {
        //textarea
        const notes = ui.body.rows[1].elements.splice(5, 1)[0];
        notes.labelPosition = "top";
        notes.height = 334;

        //form with 3 columns
        const form = ui.body.rows[1];
        form.cols = [
          { margin: form.margin, rows: ui.body.rows[1].elements },
          { rows: [notes, {}] },
          { width: 300 },
        ];
        form.margin = 20;
        delete ui.body.rows[1].elements;
        ui.body.rows[1] = form;

        //bar
        ui.body.rows[0].padding.right = 335;
      }

      return ui;
    }
}
After that, adjust saving logic for the CustomForm:
- when users click on the "Done" button, the data must be saved and form must be closed;
- when users click on the "Close" button, you can ask them whether to save the changes, if any;
// "Done" button action
 Done(exit) {
    // save data if a new task is created or the existing one is updated
    if (this.Form.isDirty())
      this.UpdateTask().then(() => this.Back(exit));
    else this.Back(exit);
 }
// "Close" icon action
Close() {
  // ask to save form data in case of changes
  if (this.Form.isDirty()) {
    webix.confirm("Save changes?")
   .then(() => this.Done(true))
               .catch(() => this.Back(true));
  } else this.Back(true);
}
// clear the form and show the Tasks area
Back(exit) {
    if (!this.Compact) {
      this.Form.clear();
      this.State.selected = this.State.parent = null;
      this.app.show("top/chart");
    } else super.Back(close);
}
Tuning Navigation
To be able to show the form instead of Tasks area, you need to replace a static subview with a dynamic one and then show Tasks area during initialization.
class CustomTopView extends gantt.views.top {
  config() {
      const ui = super.config();
       // insert dynamic subview to show chart or form
       ui.cells[0].cols[2] = { $subview: true };
       return ui;
   }
   init(view) {
        super.init(view);
        //show chart
        this.show("chart/bars");
    }
  }
Then you will be able to open the form there from the CustomInfo:
// EditTask method from the CustomInfo class described above
this.app.show("top/task.form");
And open a form when the new task is created:
// if new task is created, open the form
ShowTask(path) {
     if (this.Compact) super.ShowTask(path);
    else if (path === "form")
        this.show("task.form");
}
// preserve default hide logic only for compact mode
HideTask() {
       if (this.Compact);
         super.HideTask();
}
Finally, override the default classes via the corresponding property:
webix.ui({
  view: "gantt",
  override: new Map([
    [gantt.views["chart/bars"], CustomBarsView],
    [gantt.views.top, CustomTopView],
    [gantt.views["task/info"], CustomInfo],
    [gantt.views["task/form"], CustomForm]
  ])
});
Related sample: Gantt: Info Window and Wide Form
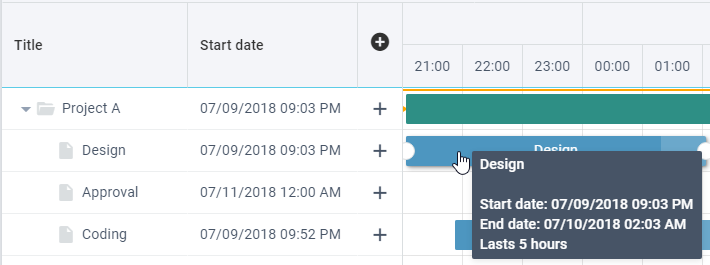
Setting Time of Tasks
This example shows how to:
- implement an ability to specify task time and display it in the Tree and task Info
- redefine tooltips to show time values in the task date and duration info
Setting Hour Scale
First of all, include a hour scale in the array of Gantt scales.
view:"gantt",
scales: [
  { unit: "day", format: "%M %d" },
  { unit: "hour", format: "%H:00" },
]
Then you will need to modify several inner classes to display task time in the interface.
Modifying Task Form and Info
To be able to set task time, you should create a new class by inheriting it from gantt.views["task/form"]. Modify JSON configuration of the form to enable timepicker for the inner calendars:
class CustomForm extends gantt.views["task/form"] {
  config() {
    const ui = super.config();

    const form = ui.body.rows[1];
    const startCal = form.elements[2];
    startCal.timepicker = startCal.suggest.body.timepicker = true;
    const endCal = form.elements[3];
    endCal.timepicker = endCal.suggest.body.timepicker = true;

    return ui;
  }
}
To display specified time in the task info window, create a new class by inheriting it from gantt.views["task/info"]. Return a string in the full-date format from its DateFormat method:
class CustomInfo extends gantt.views["task/info"] {
  DateFormat(date) {
    return webix.i18n.fullDateFormatStr(date);
  }
}
Displaying Time in the Task Tree
To display date and time in the Task tree, create a new class by inheriting it from gantt.views.tree. To render a full-date string, modify the JSON-configuration that is returned by the config method of the parent class:
class CustomTree extends gantt.views.tree {
  config() {
    const tree = super.config();

    tree.columns[1].format = webix.i18n.fullDateFormatStr;
    tree.columns[1].minWidth = 170;

    return tree;
  }
  // one more method
}
Expanding Task Tooltip
Next step is to redefine task tooltip, so that task date and duration will include time values. Create a new class by inheriting it from gantt.views["chart/bars"]. Return a template containing info about task time from the GetTooltip method:
class CustomBars extends gantt.views["chart/bars"] {
  GetTooltip(obj, _) {
    const parser = webix.i18n.fullDateFormatStr;
    let tip = `${obj.text || _("(no title)")}<br>
      <br>${_("Start date")}: ${parser(obj.start_date)}`;

    if (obj.type != "milestone") {
      const duration =
        obj.duration < 1
          ? this.GetPreciseDuration(obj, _)
          : this.GetDayDuration(obj, _);

      tip += `<br>${_("End date")}: ${parser(obj.end_date)}
      <br>${_("Lasts")} ${duration}`;
    }
    return tip;
  }

  /* gets duration of tasks that last less than 1 day and
    returns task duration in hours (for hour scale and scales with *precise: true*).
    Otherwise returns duration as 1 day */

  GetPreciseDuration(obj, _) {
    const { minUnit, precise } = this.Local.getScales();
    const showHours = minUnit === "hour" || precise;
    return showHours
      ? `${Math.round(obj.duration * 24)} ${_("hours")}`
      : `1 ${_("day")}`;
  }

  GetDayDuration(obj, _) {
    return `${obj.duration} ${obj.duration > 1 ? _("days") : _("day")}`;
  }
}
Finally, do not forget to override default classes:
webix.ui({
  view: "gantt",
  url: "https://docs.webix.com/gantt-backend/",
  override: new Map([
    [gantt.views.tree, CustomTree],
    [gantt.views["task/info"], CustomInfo],
    [gantt.views["task/form"], CustomForm],
    [gantt.views["chart/bars"], CustomBars],
  ]),
});
Related sample: Gantt: Setting Time of Tasks
Creating a Snapshot of the Current Positions of Tasks
This example demonstrates how to set planned dates as a snapshot of the current positions of tasks.
Preparations
To enable planned dates, set the baseline property to true:
webix.ui({
    view: "gantt",
    baseline: true,
    ...
})
We need some kind of control to make a snapshot. Let's make a button called "Create a snapshot". On click, a custom createSnapshot () method will be called:
{
    view: "button",
    value: "Create a snapshot",
  ...
    click: () => createSnapshot(),
},
Getting the current state
Using the serialize() method, we get the current state of Gantt:
function createSnapshot() {
    const localTasks = $$("gantt")
        .$app.getService("local")
        .tasks();
    const data = localTasks.serialize();
...
Setting baseline properties
To save the start and end dates as planned_start and planned_end, and the duration as planned_duration, we declare a separate setBaseline() function:
function setBaseline(branch) {
    branch.forEach(t => {
        if (t.type != "milestone") {
            t.planned_start = t.start_date;
            t.planned_end = t.end_date;
            t.planned_duration = t.duration;
            if (t.data) setBaseline(t.data);
        }
    });
}
Then we will call it inside the createSnapshot() method to set baseline properties for all tasks:
    ...
    setBaseline(data);
    ...
Updating local data
In the end, we need to clear all collections with the clearAll() method and use the parse() method to load our modified data into the component:
    ...
    localTasks.clearAll();
    localTasks.parse(data);
}
Related sample: Gantt: Creating Snapshots
Back to top