Kanban UI Editor
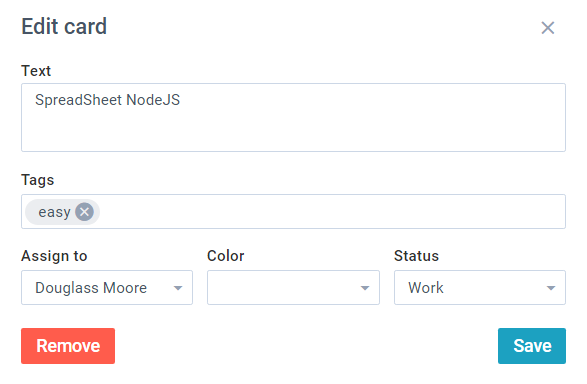
Each Kanban card can be edited with the help of the UI Editor. It opens when a user double-clicks the card or clicks the pencil icon on a card.
Editor is disabled by default. To enable it, you must set the editor property in the Kanban configuration.
webix.ui({
    view:"kanban",
    cols:[
        { header:"Backlog", body:{ view:"kanbanlist", status:"new" } },
        { header:"In Progress", body:{ view:"kanbanlist", status:"work" } }
    ],
    editor:true,        data:[
        { id:1, status:"new", text:"Test new authentication service" },
        { id:2, status:"work", user_id: 5, text:"Performance tests" }
    ]
});
The default Editor has the following controls:

Related sample: Default Editor
Adding and Deleting Cards
You can use the editor to add and delete cards as well. The editor can be opened with the showEditor method:
{
    view:"button", css:"webix_primary",
    label:"Add new card", width:150,
    click:() => {
        $$("myBoard").showEditor();
    }
}
You can delete cards by a click on the "Remove" button of the editor.
Related sample: Kanban: Adding New Items
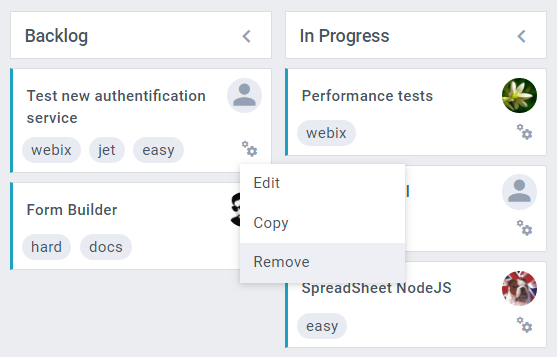
Or you can remove cards with the help of a card action menu:

Card Attachments
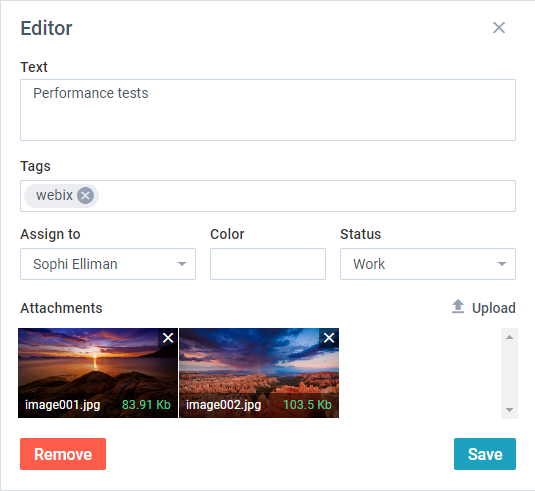
Kanban Editor allows visualizing attached files, as well as adding new attachments to the cards.

Attachments data are stored in the attachments property of the data item. attachments contains the path to already uploaded files, the size of the file and the ID.
//item data
{ "status":"new", "text":"Webix Jet tutorial", "attachments":[
    {"id":8, "link":"/kanban/samples/server/attachments/image004.jpg", "size":84683}
]}
To show the files within the Kanban editor, delete or upload the new ones, you need to provide the upload URL as follows:
const apiRoot = "/kanban/samples/server";

webix.ui({
    view:"kanban",
    cols:[
        { header:"Backlog", body:{ view:"kanbanlist", status:"new" } },
        { header:"In Progress", body:{ view:"kanbanlist", status:"work" } }
    ],
    url: apiRoot + "/tasks/cards",
    save: "json->" + apiRoot + "/tasks/attachments",
    attachments: apiRoot + "/attachments"     });
Related sample: Kanban: Attachments to cards
Customizing Editor
Defining Controls
You can change the editor by redefining its controls in the Kanban configuration. Provide a set of controls in the editor property:
webix.ui({
    view:"kanban",
    cols:[
        { header:"Backlog", body:{ view:"kanbanlist", status:"new" } },
        { header:"In Progress", body:{ view:"kanbanlist", status:"work" } },
        { header:"Done", body:{ view:"kanbanlist", status:"done" } }
    ],
    editor:[
        { view:"text", name:"text", label:"Task" },
        { view:"multicombo", name:"tags", label:"" },
        {
            view:"richselect", name:"user",
            options:[
                { id:1, name:"China Mieville" },
                { id:2, name:"Helen Walsh" },
                { id:3, name:"Jeff Noon" }
            ]
        }
    ],
    data:[
        { id:1, status:"new", text:"Test new authentication service" },
        { id:2, status:"work", user_id: 5, text:"Performance tests" }
    ]
});
The names of controls must be the same as the properties of Kanban data items.
Setting Editor Configuration
You can also set the editor as a form object with various configuration settings. For example, you can add validation by setting form validation rules:
webix.ui({
    view:"kanban",
    editor:{
        elements:[
            { view:"textarea", name:"text", label:"Task", height:90 },
            {
                margin:10,
                cols:[
                    { view:"multicombo", name:"tags", label:"Tags",
                    options:tags_set },
                    { view:"combo", name:"user_id", label:"Assign to",
                    options:users_set }
                ]
            }
        ],
        rules:{
            text: webix.rules.isNotEmpty,
            user_id: webix.rules.isNotEmpty
        }
    },
    data: full_task_set,
    tags: tags_set,
    users: users_set
});
Related sample: Custom Editor:: Validation
Back to top