Menu Configuration Settings
You can add a dropdown menu at the top of the SpreadSheet. It allows saving space on the toolbar, moving some of its commands to the menu.

To add a default menu, set the menu property to true.
webix.ui({
    view:"spreadsheet",
    data: math_data_simple,
    menu: true
});
The default menu has the same structure as the full toolbar.
Settings for the default menu are specified in the menu configuration array. This array contains objects, each representing a single block of the menu. These objects have the id property with the name of the block, and the submenu property with the array of objects representing menu options. Each object in submenu can also have the id with the name of the block or option and (optionally) submenu. Check the example below:
const menu = [
    { id: "file", submenu: [
        { id: "sheet", submenu: [
          { id: "new-sheet" },
          { id: "copy-sheet" },
          { id: "remove-sheet" },
          { id: "hide-sheet" }
        ]}
    ]},
    { id: "undo-redo", submenu: [
        { id: "undo" },
        { id: "redo" }
    ]}
]
Menu Structure
This section provides a detailed description of each block of Menu options. There are the following menu blocks:
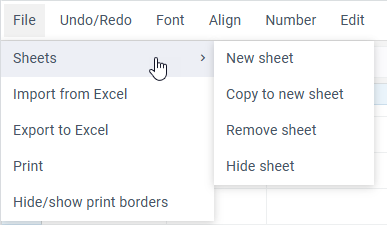
File block
This block includes a set of options for manipulations with sheets:
webix.ui({
    view: "spreadsheet",
    data: base_data,
    menu: [
        { id: "file", submenu: [
            { id: "sheet", submenu: [
                { id: "new-sheet" },
                { id: "copy-sheet" },
                { id: "remove-sheet" },
                { id: "hide-sheet" }
            ]},
            { id: "excel-import" },
            { id: "excel-export" },
            { id: "print" },
            { id: "print-borders" }
        ]}
    ]
});
- The "sheet" selector allows working with a sheet and contains the following options:
- "new-sheet" - for creating a new sheet
- "copy-sheet" - for copying the sheet's content into a new sheet
- "remove-sheet" - for removing a sheet
- "hide-sheet" - for hiding a sheet
- The "excel-import" option allows importing data from Excel
- The "excel-export" option allows exporting data into Excel
- The "print" option - for printing the data from a sheet
- The "print-borders" option - toggles the visibility of the printing borders
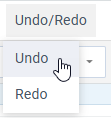
Undo/Redo block
This block includes the following options:
webix.ui({
    view: "spreadsheet",
    data: base_data,
    menu: [
        { id: "undo-redo", submenu: [
            { id: "undo" },
            { id: "redo" }
        ]}
    ]
});
- The "undo" option discards the recent change and Spreadsheet reverts to its previous state
- The "redo" option restores the cancelled (undone) change
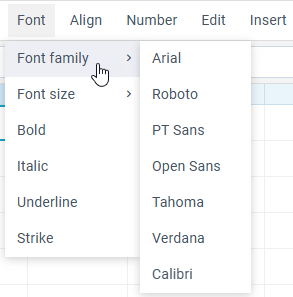
Font block
This block contains options for setting fonts and text format of the cell's content:
webix.ui({
    view: "spreadsheet",
    data: base_data,
    menu: [
        { id: "font", submenu: [
            { id: "font-family", submenu:[
                { id: "Arial", value: "Arial" },
                { id: "'Roboto', sans-serif", value: "Roboto" },
                { id: "'PT Sans', Tahoma", value: "PT Sans" },
                { id: "'Open Sans', sans-serif", value: "Open Sans" },
                { id: "Tahoma", value: "Tahoma" },
                { id: "Verdana", value: "Verdana" },
                { id: "Calibri, Tahoma", value: "Calibri" },
            ]},
            { id: "font-size", submenu: [
                { id: "8px", value: "8" },
                { id: "9px", value: "9" },
                { id: "10px", value: "10" },
                { id: "11px", value: "11" },
                { id: "12px", value: "12" },
                { id: "14px", value: "14" },
                { id: "15px", value: "15" },
                { id: "16px", value: "16" },
                { id: "18px", value: "18" },
                { id: "20px", value: "20" },
                { id: "22px", value: "22" },
                { id: "24px", value: "24" },
                { id: "28px", value: "28" },
                { id: "36px", value: "36" },
            ]},
            { id: "font-weight" },
            { id: "font-style" },
            { id: "underline" },
            { id: "strike" }
        ]}
    ]
});
- The "font-family" select allows choosing the necessary font
- The "font-size" select sets the font size
- A group of options for formatting the text content of the cell includes:
- the "font-weight" option - makes the content of the cell bold
- the "font-style" option - makes the content of the cell italic
- the "underline" option - makes the content of the cell underline
- the "strike" option - makes the content of the cell strikethrough
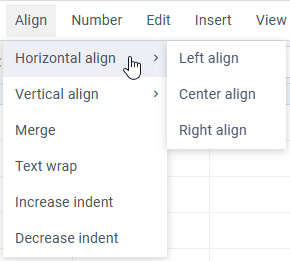
Align block
This block includes options for horizontal and vertical cell alignment, merging cells' content, the means of text wrapping, as well as indenting text in a cell to the left or to the right:
webix.ui({
  view:"spreadsheet",
  data: base_data,
  menu: [
    { id: "align", submenu: [
        { id: "text-align", submenu: [
            { id: "left" },
            { id: "center" },
            { id: "right" }
        ]},
        { id: "vertical-align", submenu: [
            { id: "top" },
            { id: "middle" },
            { id: "bottom" }
        ]},
        { id: "span" },
        { id: "wrap"},
        { id: "increase-indent"},
        { id: "decrease-indent"}
    ]}
  ]
});
- The "text-align" select allows specifying one of the three modes of text alignment in a cell: left, right or center
- The "vertical-align" select defines the mode of vertical text alignment in a cell: top, middle or bottom
- The "span" option allows merging the content of several cells as well as splitting it
- The "wrap" option lets wrap text in a cell
- The "increase-indent" option indents text in a cell to the right
- The "decrease-indent" option indents text in a cell to the left
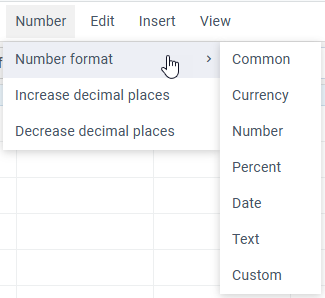
Number block
This block contains the following options:
webix.ui({
    view:"spreadsheet",
    data: base_data,
    menu: [
      { id: "number", submenu: [
          { id: "format", submenu: [
              { id: "common" },
              { id: "price" },
              { id: "int" },
              { id: "percent" },
              { id: "date" },
              { id: "string" },
              { id: "custom" }
          ]},
          { id: "increase-decimals" },
          { id: "decrease-decimals" },
      ]}
    ]
});
- The "format" select sets the format of cell content. The available formats are: Common, Currency, Number, Percent, Date, Text, Custom
- The "increase-decimals" and "decrease-decimals" options allow increasing/decreasing the number of decimal places
Edit block
This block includes a set of options for editing the cell's content:

view: "spreadsheet",
menu: [
    { id: "edit", submenu: [
        { id: "sort", submenu: [
          { id: "sort-range", submenu: [
            { id: "sort-asc" },
            { id: "sort-desc" },
            { id: "sort-custom" }
          ]},
          { id: "sort-sheet", submenu: [
            { id: "sort-sheet-asc" },
            { id: "sort-sheet-desc" }
          ]}
        ]},
        { id: "create-filter" },
        { id: "add-range" },
        { id: "conditional-format" },
        { id: "lock-cell" },
        { id: "add-link" },
        { id: "add-dropdown" },
        { id: "clear", submenu: [
            { id: "clear-value" },
            { id: "clear-style" },
            { id: "clear-conditional-formats" },
            { id: "clear-dropdown-editors" },
            { id: "clear-filters" },
            { id: "clear-comments" },
            { $template: "Separator" },
            { id: "clear-all" }
        ]},
        { id: "validation", submenu: [
            { id: "add-cell-validation" },
            { id: "remove-cell-validation" },
            { id: "highlight-invalid-data" },
            { id: "remove-highlight-invalid-data" }
        ]},
        { id: "find" }
    ]}
]
- The "sort" select contains two groups:
- "sort-range" select - sorts within the selected range; hidden for single-row selections:
- "sort-asc" option - for sorting in ascending order
- "sort-desc" option - for sorting in descending order
- "sort-custom" option - opens the multi-level sort dialog
- "sort-sheet" select - sorts the entire sheet by a column; the option labels display the first selected column name, or A if no column is selected:
- "sort-sheet-asc" option - for sorting the sheet by the specified column in ascending order (A to Z)
- "sort-sheet-desc" option - for sorting the sheet by the specified column in descending order (Z to A)
- "sort-range" select - sorts within the selected range; hidden for single-row selections:
- The "create-filter" option sets a filter in a cell
- The "add-range" option sets a named range of cells for using it further in math formulas
- The "conditional-format" option allows specifying a particular style for a cell, depending on a certain condition
- The "lock-cell" option blocks/allows editing of the cell's value
- The "add-link" option sets a link in a cell
- The "add-dropdown" option creates an editor with options in a cell
- The "clear" select contains a set of options for clearing a cell:
- the "clear-value" option - for clearing the cell value
- the "clear-style" option - for clearing styles applied to a cell
- the "clear-conditional-formats" option - for clearing conditional formatting applied to a cell
- the "clear-dropdown-editors" option - for clearing dropdown lists
- the "clear-filters" option - for clearing the applied filters
- the "clear-comments" option - for clearing the comments
- the "clear-all" option - for clearing all of the above
- The "validation" select contains a set of options for validating the cells' content:
- the "add-cell-validation" option - for adding validation rules to a cell
- the "remove-cell-validation" option - for removing validation rules from a cell
- the "highlight-invalid-data" option - for highlighting cells with invalid data
- the "remove-highlight-invalid-data" option - for removing highlighting from cells with invalid data
- The "find" button - for finding the specified content
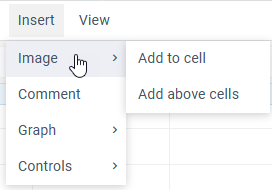
Insert block
This block includes a set of options for additional content, which can be attached to cells:
view: "spreadsheet",
menu: [
    { id: "insert", submenu: [
        { id: "image", submenu: [
            { id: "add-image-cell" },
            { id: "add-image-top" }
        ]},
        { id: "graph", submenu: [
            { id: "add-sparkline" },
            { id: "add-chart" }
        ]},
        { id: "add-comment" },
        { id: "controls", submenu: [
            { id: "add-checkbox" },
            { id: "add-radio" }
        ]}
    ]}
]
- The "image" select contains:
- "add-image-cell" to insert an image into a cell
- "add-image-top" to add an image above cells
- The "graph" select contains:
- "add-sparkline" to insert a sparkline into a cell
- "add-chart" to insert a chart above cells
- The "add-comment" option adds a comment into a cell
- The "controls" select contains:
- "add-checkbox" to add a a checkbox into a cell
- "add-radio" to add a radio button into a cell
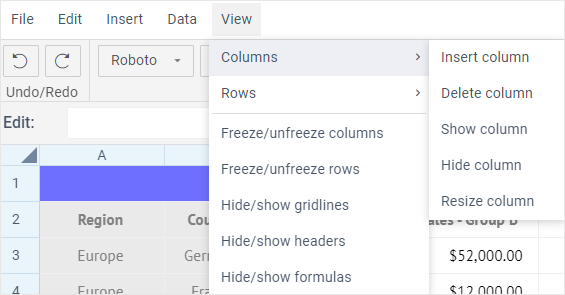
View block
This block includes the following options:
view: "spreadsheet",
menu: [
    { id: "view", submenu: [
      { id: "column", submenu: [
        { id: "add-column" },
        { id: "del-column" },
        { id: "show-column" },
        { id: "hide-column" },
        { id: "resize-column" },
        { id: "group-column" },
        { id: "ungroup-column" },
        { id: "format-column", submenu:[
          { id: "common-column" },
          { id: "price-column" },
          { id: "int-column" },
          { id: "percent-column" },
          { id: "date-column" },
          { id: "string-column" },
          { id: "custom-column" }
        ]}
      ]},
      { id: "row", submenu: [
        { id: "add-row" },
        { id: "del-row" },
        { id: "show-row" },
        { id: "hide-row" },
        { id: "resize-row" },
        { id: "group-row" },
        { id: "ungroup-row" },
        { id: "format-row", submenu:[
          { id: "common-row" },
          { id: "price-row" },
          { id: "int-row" },
          { id: "percent-row" },
          { id: "date-row" },
          { id: "string-row" },
          { id: "custom-row" }
        ]}
      ]},
      { id: "freeze-columns" },
      { id: "freeze-rows" },
      { id: "hide-gridlines" },
      { id: "hide-headers" },
      { id: "show-formulas" }
   ]}
]
- The "row" select is used to insert, delete, show, hide, resize, group, ungroup, and set format for rows
- The "column" select contains similar options for columns
- The "freeze-columns" option freezes and unfreezes columns
- The "freeze-rows" option freezes and unfreezes rows
- The "hide-gridlines" option toggles gridlines of Spreadsheet
- The "hide-headers" option toggles the headers of rows and columns
- The "show-formulas" option shows formulas in cells instead of values
Note that all available default options are already added to the menu. You can only delete or reorder them.
Customizing Menu
You can change the top menu in two ways: by setting the menu property as an array of options or by changing this array in the onViewInit handler.
Customizing via configuration
Removing a block or an option
In case you want to remove some blocks or options from the default configuration, set the menu array without them.
Adding a custom block or an option
To add custom option/block into the menu, you should specify it as a value of the id property, and its label as a value of the value property.
There are two ways to add a label to a custom option/block:
- via the locale
- via the value property
If you are using locale, key would be the value of the id property of your option and value would be the label:
webix.i18n.spreadsheet.menus["new-option"] = "New option";
Then you can add your option to the menu array during SpreadSheet configuration:
menu: [{ id: "new-option" }]
Another way to add a label is to set the value property directly at the menu array while also setting the id property of your option:
menu: [{ id: "new-option", value: "New option" }]
Note that this method won't allow localization.
To define the action that will be triggered when your option is selected, you should attach a handler to Spreadsheet onCommand event:
webix.ready(function(){
  webix.ui({
    view: "spreadsheet",
    data: base_data,
    menu: [{ id: "new-option", value: "My option" }],
    on: {
      onCommand(obj) {
        if (obj.id === "new-option")
          webix.message("click on custom option");
      }
    }
  });
});
If you want to add an option from the existing list of commands, specify it as a value of the id property of the corresponding object in the submenu array:
{
    id: "my-options",
    value: "My Options",
    submenu: [
        { id: "excel-import" },
        { id: "new-sheet" }
    ]
}
Customizing via event
You can also use the onViewInit event to add or remove custom blocks and options of the default menu. For example, this is how you can add an option:
webix.ui({
  view: "spreadsheet",
  menu: true,
  on: {
    onViewInit(view, config){
      if (view == "menu"){
        config.data.push({ id: "new-option", value: "New option" });
      }
    }
  }
});