Available only in PRO Edition
Barcode
The widget is available in the Webix Pro edition.
API Reference
Overview
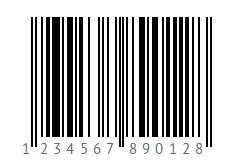
The Barcode widget represents text values in a machine-readable format by varying the widths and spacing of parallel lines.
The widget uses Canvas for lines rendering.

Basic Initialization
To begin with, create a new HTML file and include the related Webix code files in it.
Required code files are:
- webix.css
- webix.js
A basic html page with the included code files
<!DOCTYPE html>
<html>
<head>
   <meta http-equiv="Content-Type" content="text/html; charset=utf-8" />
   <title>Barcode</title>
   <script src="../codebase/webix.js" type="text/javascript" charset="utf-8"></script>
   <link rel="stylesheet" href="../codebase/webix.css" type="text/css" charset="utf-8">
</head>
<body>
    <script>        //here you will place your JavaScript code    </script>
</body>
</html>
Next, you should create a div container to place your barcode into.
<div id="box" style="width:300px;height:200px;"></div>Now you can initialize the widget.To create a new Barcode object, you need to use the following constructor:
Barcode constructor
barcode = new webix.ui({view:"barcode"});
If you want to place the component into the container, you should specify the container property inside of the view constructor:
Basic barcode configuration
barcode = new webix.ui({
    container:"box",
    view:"barcode"
});
Related sample: Barcode Initialization
Configuration Settings
You can set the following properties to configure Barcode:
- type - sets the barcode type. There are 3 built-in types: "ean8", "ean13" and "upcA" ("ean13" is the default one):
webix.ui({
    view:"barcode",
    type: "upcA"
});

//or
var barcode = webix.ui({
    view:"barcode"
});
barcode.define("type", "upcA");
- value - sets barcode value (text):
webix.ui({
    view:"barcode",
    value: "123456789012"
});
- width - defines the view width
webix.ui({
    view:"barcode",
    width: 250
});
If you want to set flexible width, you need to set the -1 value for this property:
webix.ui({
    view:"barcode",
    width: -1
});
- height - defines the view height
webix.ui({
    view:"barcode",
    height: 180
});
If you want to set flexible height, you need to set the -1 value for this property:
webix.ui({
    view:"barcode",
    height: -1
});
- paddingX - sets the left and right paddings (space between widget border and bars)
webix.ui({
    view:"barcode",
    paddingX: 20
});
- paddingY - sets the top and bottom paddings
webix.ui({
    view:"barcode",
    paddingY: 10
});
- textHeight - sets the height of the text block
webix.ui({
    view:"barcode",
    textHeight: 20
});
- color - sets the bar color
webix.ui({
    view:"barcode",
    color: "#000"
});
Setting Value
You can set the value in two ways:
- via the value property in Barcode configuration
- using the setValue method
var barcode = new webix.ui({
   view:"barcode",
   value: "123456789012"
});
// set the new value
barcode.setValue("453456789015");
Type Definition
Webix Barcode includes 3 definitions for most popular barcodes (EAN8, EAN13 and UPC-A):
- ean8
- ean13
- upcA
"ean13" is the default type.

Use the type property to set the Barcode type:
barcode = webix.ui({
    view:"barcode",
    type: "upcA"
});
The type of Barcode can be changed dynamically via the define method. After the changes are applied, you need to call the render method to redraw Barcode with the new type:
barcode.define("type","ean8");
barcode.render();
Related sample: Built-in Types
Custom Types
If you need create a custom barcode, you can add the necessary type to the existing Barcode view.
Each barcode type should contain a function that returns a sequence of "0" and "1" chars based on the incoming text value. This 0-and-1 character combination will be used for bar rendering.
The Library will render black bars for "1" chars and leave gaps for the "0" ones.
To add a new type you need to use the webix.type method that takes two parameters:
- ui object that the type will be created for ( webix.ui.barcode for Barcode)
- object with type configuration
webix.type( webix.ui.barcode, {
    /* type configuration here */
});
Type configuration of Barcode must contain 3 properties:
- name - (string) the name of the code
- encode - (function) the function that returns sequence of "1" and "0" chars for black-and-white bar rendering
- template - (function) the function that returns text for barcode
Let's consider an example of the "code39" barcode configuration:
1) define type name in the type configuration:
name:"code39",
2) set an array with encodings for 43 characters, consisting of uppercase letters (A through Z), numeric digits (0 through 9) and a number of special characters (-,., $, /, +, %, and space):
encodings:[
    "110101001011",
    "101101001011",
    ...
]
3) set the template function that will convert the incoming text to uppercase and add "*" as start and stop characters:
 template: function(value){
      return ("*" + value + "*").toUpperCase();
 }
4) define the encode method that will apply 0-1 sequences from encodings array to incoming text value
encode: function(value){
    var chars = "ABCDEFGHIJKLMNOPQRSTUVWXYZ0123456789-. $/+%*";
    var code ="";

    // apply template method
    value = this.template(value);

    for(var i=0; i<value.length; i++){
        var pos = chars.indexOf( value.charAt(i) );
        if (pos < 0)
            return "";
        if (i)
            code += "0";

        // apply encoding for character
        code += this.encodings[pos];
    }
    return code;
}
So, the whole "code39" type definition will be as in:
webix.type(webix.ui.barcode, {
    // name
    name: "code39",

    // encodings for "A","B", etc. characters
    encodings: [
        "110101001011",
        "101101001011",
            ...
    ],

    // applies encoding for incoming text
    encode: function(value){
        var chars = "ABCDEFGHIJKLMNOPQRSTUVWXYZ0123456789-. $/+%*";
        var code ="";

        // apply template method
        value = this.template(value);

        for(var i=0; i<value.length; i++){
            var pos = chars.indexOf( value.charAt(i) );
            if (pos < 0)
                return "";
            if (i)
                code += "0";

            // apply encoding for character
            code += this.encodings[pos];
        }
        return code;
    },

    // returns text for code39 barcode
    template: function(value){
        return ("*" + value + "*").toUpperCase();
    }
 });
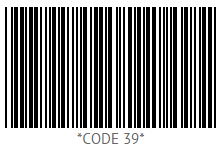
Here is an example of the "code39" usage:
barcode = webix.ui({
   view: "barcode",
   type: "code39",
   value: "CODE 39"
});
The result of applying the "code39" type is given in the picture below:
