SideMenu
Since 3.1
API Reference
Overview
The SideMenu widget inherits from Window and can be bound to any side of the screen (top, bottom, right, left). You can place any other view or even a complex layout inside of SideMenu.
Initialization
To initialize SideMenu, you need to define all the necessary parameters in the webix.ui() constructor. Don't forget to set the necessary width/height values and specify the desired position of the SideMenu (the details are given below):
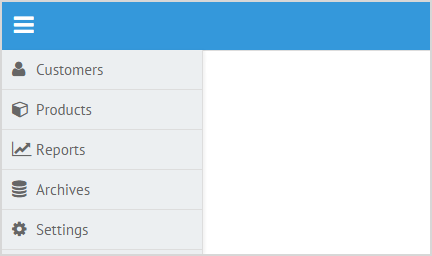
webix.ui({
    view: "sidemenu",
    id: "menu",
    width: 200,
    position: "left",
    body:{
        view:"list",
        borderless:true,
        scroll: false,
        template: "<span class='webix_icon fa-#icon#'></span> #value#",
        data:[
            {id: 1, value: "Customers", icon: "user"},
            {id: 2, value: "Products", icon: "cube"},
            {id: 3, value: "Reports", icon: "line-chart"},
            {id: 4, value: "Archives", icon: "database"},
            {id: 5, value: "Settings", icon: "cog"}
        ]
    }
});
Related sample: Sidemenu: Left Position
SideMenu Sizing and Positioning
You can specify the necessary width and height of SideMenu, depending on its position. SideMenu can appear from the top, bottom, left or right sides of the screen.
If you use the "left" or "right" SideMenu position, you can specify the width dimension. In the case of "top" or "bottom" SideMenu, the height dimension can be set. The dimension which is not set directly (height for the left/right SideMenu and width for the top/bottom SideMenu) will be automatically adjusted to the size of the screen.
For example:
webix.ui({
    view: "sidemenu",
    position: "right",
    width: 200,
    body:{
        ...
    }
});
Related sample: Sidemenu: Right Position
Customizing Size and Position
You can customize the size and position of SideMenu in the necessary way. It's done with the help of the state function that takes as a parameter an object containing the position and size values that will be set as SideMenu properties:
- top;
- left;
- width;
- height.
For example, if there's a toolbar in an application and left SideMenu should be shown below it, you need to increase the "top" property of the state object by the toolbar height and decrease the "height" one by the same value:
webix.ui({
    view: "sidemenu",
    width: 200,
    position: "left",
    state:function(state){
        // get the toolbar's height
        var toolbarHeight = $$("toolbar").$height;
        // increase the 'top' property
        state.top = toolbarHeight;
        // decrease the 'height' property
        state.height -= toolbarHeight;
    };
});
Related sample: Sidemenu: Left Position
Hiding/showing SideMenu
You can hide and show SideMenu by clicking a button. For this purpose, the hide and show methods should be used.
webix.ui({
    {view: "toolbar", id:"toolbar", elements:[
        {
            view: "icon", icon: "mdi mdi-menu",
            click: function(){
                if( $$("menu").config.hidden){
                    $$("menu").show();
                }
                else
                    $$("menu").hide();
            }
        },
        {}
    ]}
});

webix.ui({
    view: "sidemenu",
    id: "menu",
    width: 200,
    position: "left",
    body:{
        ...
    }
});
In the above code we've defined the icon button taken from the Material Design Icons collection. Check common rules of using icons.
On clicking the icon we check whether the menu is hidden. If the menu is initially hidden, it will be shown on the icon's click. If it's shown, it will be hidden.
Back to top