Available only in PRO Edition
TreeMap
Since 3.1
The widget is available in the Webix Pro edition.
API Reference
Overview
UI-related TreeMap inherits from view and allows visualizing hierarchical structures in a space-limited way - as a set of nested rectangles. It takes most part of API from TreeStore.
Initialization
To initialize TreeMap on the page, you need to specify the necessary configuration:
webix.ui({
    view:"treemap",
    select: true,
    template: function(item){
        return item.label||"";
    },
    value: "#value#",
    data: [
        { id:"1", label: "Technology", data:[
            { id:"1.1", value:"50" },
            { id:"1.2", value:"30" },
            { id:"1.3", value:"20" }
        ]},
        { id:"2", label: "Healthcare", data:[
            { id:"2.1", value:"80" },
            { id:"2.2", value:"10" },
            { id:"2.3", value:"60" },
            ...
        ]},
        ...
    ]
});
Related sample: TreeMap Initialization
Configuration Settings
There are main configuration parameters that you can set to configure the TreeMap in the needed way:
- template - (function) defines HTML content displayed in rectangles
webix.ui({
    view:"treemap",
    template: function(item){
        return item.category|| "";
    }
});
- value - (string,function) a template that specifies the area of an item rectangle
webix.ui({
    view:"treemap",
    value: "#value#"
});
- type - (object) defines the peculiarities of the TreeMap rendering
For example, you can set the cssClass function or the template one inside of the type property:
webix.ui({
    view:"treemap",
    type:{
        cssClass: function(item){
            // css config
        },
        template: function(item){
            return item.category|| "";
        }
    }
});
- activeItem - (boolean) specifies if children of the branches will be rendered in the TreeMap, false by default
webix.ui({
    view:"treemap",
    activeItem:true
});
- subRender - (boolean) defines if the sub-elements should be rendered for the first-level branches, true by default
webix.ui({
    view:"treemap",
    subRender: false
});
- headerTemplate - (string) sets the template for the header label
webix.ui({
    view:"treemap",
    headerTemplate: "#category#"
});
- branch - (string) sets the id of a sub-branch that will expand showing its sub-elements
webix.ui({
    view:"treemap",
    branch: "2.1"
});
Styling TreeMap
Besides the correlation of rectangles' size, you can also define colors for items to show a separate dimension of the data.
For example, you can set color graduation for the TreeMap elements, depending on the number of comments they have. You should define a cssClass method in the TreeMap type to specify rectangles' styles depending on the comments' number:
webix.ui({
    view:"treemap",
    value: "#views#",
    type:{
        cssClass: function(item){
            var css,
            comments = item.comments;

            if(!this.isBranch(item.id)){
                if(comments > 30)
                    css = "item3";
                else if(comments > 20)
                    css = "item2";
                else if(comments > 10)
                    css = "item1";
                else
                    css = "item0";
            }
            return css;
        },
    },
    url: "data/data_colors.json"
});
In the above example the cssClass parameter sets a function that takes an element object as a parameter. We want to color only leaves (items with no sub-items), so we check if the element is not a branch.
Elements are colored according to the next logic: the more comments the items have, the more saturated their color will be.
The colors that correspond to this or that rule are specified in the css style definition:
<style>
    .item0{ background: #bbdefb; }
    .item1{ background: #90caf9; }
    .item2{ background: #64b5f6; }
    .item3{ background: #42a5f5; }
</style>
Related sample: Coloring TreeMap
One-Level Rendering
You can set the mode in which only first-level branches are displayed in the TreeMap. But if values are set only for leaves items, you need to calculate them for branches in order to define rectangles style.
For this purpose, we need to count the average number of comments in our example. Let's specify the getCss function with the appropriate configuration:
function getCss(item){
    var color = "",
    comments = item.comments,
    id = item.id,
    num = 0, sum = 0;

    if(this.isBranch(id)){
        // average number of comments in a branch
        this.data.eachLeaf(id,function(item){
            sum += item.comments*1;
        num++;
        });
        comments = sum/num;
    }

    if(comments > 30)
        color ="#26a69a";
    else if(comments > 20)
        color ="#4db6ac";
    else if(comments > 10)
        color ="#80cbc4";
    else
        color ="#b2dfdb";

    return { background: color};
}
The isBranch() method checks whether an item is a branch. And the eachLeaf() method allows looping through all leaves to get the sum of elements' comments and getting the average number as a result.
Thus, we get the average number of comments in a branch and can use this number in the template of the value parameter.
The defined getCss() method should be set as the cssClass property to apply CSS styling to rectangles:
webix.ui({
    view:"treemap",
    type:{
        cssClass: getCss
    },
    activeItem: true,
    subRender: false,
    headerTemplate: "#category#",
    template: function(obj){
        return obj.$level == 1? obj.category: "";
    },
    value: "#views#",
    url: "data/data.json"
});
The key parameters here are:
activeItem - (boolean) specifies if children of the branches will be rendered in the TreeMap, false by default
subRender - (boolean) defines if the sub-elements should be rendered for the first-level branches, true by default
Related sample: TreeMap: One-Level Rendering
Handling Events
Since TreeMap component inherits its API from TreeStore, it supports the handling of almost the same events. You can check the full list of events in the API reference.
TreeMap supports various events that can be used to provide a custom behavior for TreeMap.
There are 2 ways you can add a handler to the event:
- through the method attachEvent();
- through the parameter on.
Event names are case-insensitive
Method attachEvent()
You can attach several handlers to the same event and detach them using two respective methods:
A general way to attach/detach the event handler
// to attach event
var myEvent = $$("treemap").attachEvent("onItemClick", function () {
// event handler code
})

//to detach event
$$("treemap").detachEvent(myEvent);
Parameter 'on'
With the help of parameter on you can also attach any event(s) to a TreeMap object. But in contrast to using the attachEvent method you can't detach the attached events later.
Attaching the event handler through parameter 'on'
webix.ui({
    view:"treemap",
    ...
    on: {
        onitemClick: function (id) {
            alert("item has just been clicked");
       }
    }
});
Cancelable Events
All events with the sub-word 'onBefore' can be canceled.
To cancel some event you should return false within the appropriate event handler.
Canceling the event handler
var myEvent = $$("treemap").attachEvent("onBeforeSelect", function (id) {
    ... // some event handler code
    return false;
})
Accessible objects and data
Inside the event handler you can refer to the holder component through the keyword this. Besides, most event handlers get incoming argument(s), like the id of a data item (see TreeMap events to know exactly what arguments are passed inside event handler).
By the way, using the id of a data item you can access this item itself and all its properties. For example:
Referring within the event handler
$$("treemap").attachEvent("onAfterSelect",function(id){
  var level = this.getItem(id).$level;
})
Related sample: TreeMap: Events
Setting Header
You can specify the displaying of branches' titles in the header of the TreeMap. The titles are set using the headerTemplate property in the component's configuration:
webix.ui({
    view:"treemap",
    headerTemplate: "#category#"
});
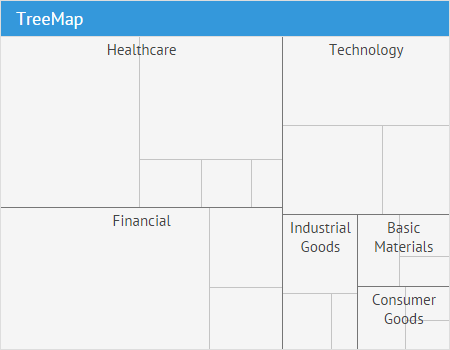
In our example, the item's category is taken as the value of the headerTemplate property. So, a TreeMap with an opened first-level branch will look like this:

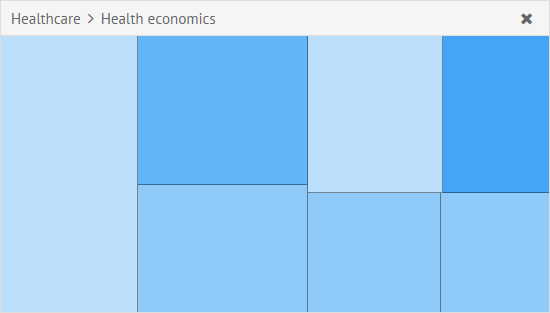
Now if we click on the "Health Economics" sub-branch of the "Healthcare" category, the header will be displayed as the "Main Category> Subcategory":
Related sample: TreeMap: Header
Back to topIf you have not checked yet, be sure to visit site of our main product Webix best ui framework and page of TreeMap product.