ContextMenu
API Reference
Overview
ContextMenu is triggered by a right mouse click. ContextMenu inherits from both Window and List. It looks the same as the Menu and shares most of its properties, methods, and events.
Initialization
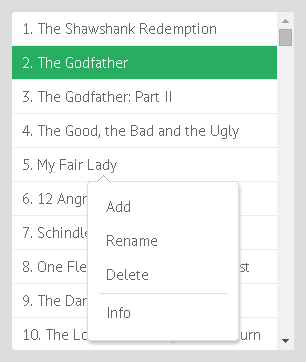
1. The shortest way to initialize a simple context menu requires the view type and an array of menu options. Apart from option strings, the array can also include:
{ $template:"Spacer" }that adds a spacer between options{ $template:"Separator" }that adds a thin line between options
For example:
webix.ui({
    view:"contextmenu",
    data:[
        "Add",
        "Rename",
        "Delete",
        { $template:"Separator" },
        "Info"
    ]
});
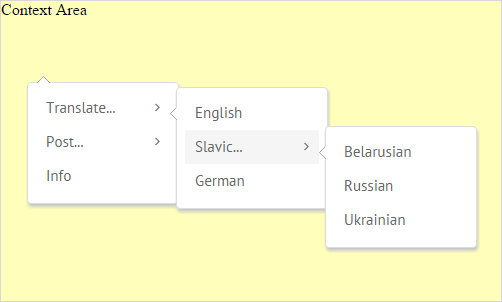
2. You can create a multi-level context menu if you set the options as an array of objects. Each object can contain the following properties:
- value (string) - the option name,
- submenu (array) - an array of submenu options.
webix.ui({
    view:"contextmenu",
    data:[
        { value:"Translate...", submenu:[
            "English", "Belarusian", "Korean"
        ]}
        // more data
    ],
    master:"areaB"
});
Attaching ContextMenu
ContextMenu can be attached to any Webix component or an HTML element. You can attach a context menu in two ways:
1. with the help of the master property
webix.ui({
    view:"contextmenu", id:"cm",
    data: ["Add", "Rename", "Delete"],
    master:$$("grid")   // component object
});
You can link a context menu either to the component object or to its HTML container.
2. with the help of the attachTo method
For example, this is how you can add a context menu to a datatable:
webix.ui({
    view:"datatable", id:"grid",
    autoConfig:true, data:grid_data,
    ready(){
        webix.ui({
            view:"contextmenu", id:"cm",
            data: ["Add", "Rename", "Delete"]
        }).attachTo(this);
    }
});
The method accepts the IDs of HTML elements and component objects, e.g.:
$$("cm").attachTo($$("button1").$view);
$$("cm").attachTo(document.getElementById("myElement"));
$$("cm").attachTo($$("grid"));
For some components, e.g. List, you must also include the onContext property into their configuration:
webix.ui({
    view:"list",
    id:"list",
    // ...list config
    onContext:{} // empty
});
$$("cm").attachTo($$("list"));
Related sample: Context Menu: Attaching to List
Working with ContextMenu
Getting the Item Value
You can track clicks on contextmenu options by attaching event listeners to the onMenuItemClick event:
//for a one-level contextmenu
$$("my_menu").attachEvent("onMenuItemClick":function(id){
    webix.message(this.getItem(id).value);
});

//for a multi-level contextmenu
$$("my_menu").attachEvent("onMenuItemClick", function(id){
    var menu = this.getMenu(id);
    webix.message(menu.getItem(id).value);
});
Getting the Master Component
The master component or HTML element can be returned with the getContext method, e.g.:
webix.ui({
    view:"contextmenu",
    // ...config
    on:{
        onMenuItemClick:function(id){
            var context = this.getContext();
            // ...access the API or data of the master component
        }
    }
});
Related sample: Context Menu: Attaching to List
Related Articles
Back to topIf you have not checked yet, be sure to visit site of our main product Webix js framework and page of context menu javascript product.